How to recover deleted photos on iPhone or iPad | Apple Support

I open Photos, scroll to Utilities and tap Recently Deleted, then tap View Album and authenticate with Face ID, Touch ID, or my passcode.

I check the days remaining beside each photo or video because items older than 30 days are permanently deleted.

I tap Select, choose the photos or videos I want to recover, then tap the More button and pick Recover, confirming when prompted. To restore everything at once I tap Select, More, Recover All, and confirm Recover.

Finally I return to my library to find the recovered items back where they belong. Keep an eye on storage and back up.

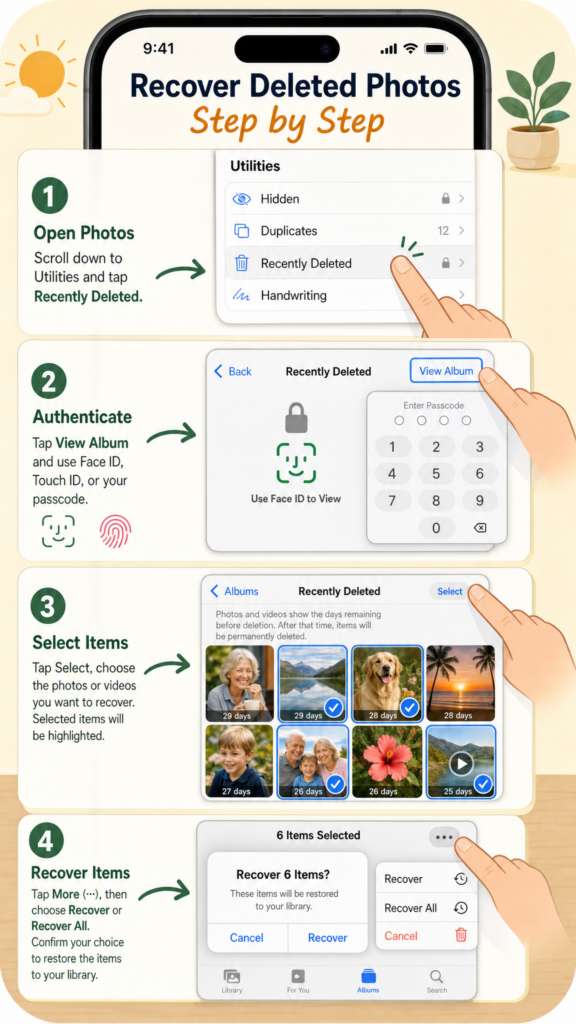
  • Open Photos → Utilities → Recently Deleted and View Album.
  • Authenticate with Face ID, Touch ID, or passcode.
  • Check days remaining; items older than 30 days are permanently deleted.
  • Tap Select, choose items, More → Recover (or Recover All) and confirm.
  • Return to your library; consider backing up to avoid loss.

How to start up from macOS Recovery | Apple Support

I’ll show you how to start up in macOS Recovery: first shut down your Mac. On Apple silicon Macs, press and hold the power button until startup options appear, then choose Options → Continue.

On Intel-based Macs, restart while holding Command‑R until Recovery starts.

In Recovery, open Disk Utility to repair or erase your startup disk, choose Reinstall macOS to reinstall the system, or pick Restore from Time Machine Backup to recover files.

If you don’t know your Mac type, try both methods safely.

When you’re done, restart normally. Keep it connected to power during updates always.

  • Shut down your Mac, then use the Apple silicon or Intel method to enter macOS Recovery
  • Apple silicon: press & hold power until Options → Continue appears
  • Intel: restart and hold Command‑R during startup
  • In Recovery use Disk Utility, Reinstall macOS, or Restore from Time Machine
  • Restart when finished; stay plugged into power for long operations

How to customize your Home Screen on iPhone and iPad | Apple Support

I start by touching and holding my Home Screen until the apps begin to jiggle, then I tap Edit in the top-left corner.

Next, I select Customize to change how my app icons and widgets look. I can tap Large to make icons bigger without labels or Dim to darken the wallpaper for better focus.

Then I choose between Light, Dark, Auto, Clear, or Tinted styles. If I pick Tinted, I adjust the color and saturation sliders to my preference.

Once everything looks right, I tap outside the menu to apply the changes and enjoy my newly customized Home Screen.

  • Touch and hold Home Screen → tap Edit
  • Select Customize to change appearance
  • Choose styles: Light, Dark, Auto, Clear, or Tinted
  • Adjust size, dim wallpaper, or color sliders
  • Tap outside menu to save changes

How to back up your iPhone or iPad with your Mac | Apple Support

Backing up your iPhone or iPad to your Mac keeps your data safe and easy to recover if your device is ever lost or replaced.

Start by connecting your iPhone to your Mac using a compatible cable. Click Allow if prompted, then open Finder and select your device in the sidebar.

Click Trust on your Mac, then tap Trust on your iPhone and enter your passcode.

To include Health and Activity data, check Encrypt Local Backup and set a password. Click Back Up Now and enter your passcode to begin.

Watch the progress bar until the backup completes successfully.

  • Connect iPhone to Mac with a cable, then click Allow and Trust on both devices
  • Open Finder and select your device in the sidebar
  • To include Health data, check Encrypt Local Backup and set a password
  • Click Back Up Now and enter your passcode to start
  • Wait for the progress bar to complete — backup date and time will appear when done

How to upgrade and manage your iCloud storage on iPhone | Apple Support

Start by checking if your iCloud storage is full, then open Settings and tap your name at the top.

Next, select iCloud and tap Manage Storage to view what’s using space. To get more storage, tap Change Storage Plan and choose a larger option, then confirm your upgrade.

After upgrading, return to storage settings to review personalized recommendations. Follow prompts to remove unnecessary files, delete old backups, or optimize photos.

You can also manage apps using iCloud storage individually.

Repeat these steps regularly to keep your storage organized and ensure your iPhone continues running smoothly without interruptions.

  • Open Settings → Tap your name → iCloud → Manage Storage
  • Tap Change Storage Plan to upgrade storage
  • Choose a plan and confirm purchase
  • Review storage recommendations to free space
  • Delete unused files, backups, or optimize photos

How to set up eSIM on iPhone | Apple Support

First, I make sure my iPhone supports eSIM, my carrier offers it, and my software is up to date, with Wi-Fi ready if needed.

Next, during setup, I choose the activation method my carrier supports. If I’m moving from another iPhone, I keep the old device nearby, tap the lines to transfer, and follow the prompts on both phones to finish Quick Transfer.

If my carrier preassigns an eSIM, I join Wi-Fi and continue until service appears.

I can also scan a QR code. After setup, I open Settings, tap Cellular, add or set up a line, and complete activation.

  • Make sure your iPhone supports eSIM, your carrier supports it, and iOS is updated.
  • During setup, choose your carrier’s activation method.
  • Use Quick Transfer if you’re moving your number from a nearby old iPhone.
  • If needed, activate by carrier setup or by scanning a QR code.
  • After setup, go to Settings > Cellular to add or activate an eSIM line.

How to use Guided Access on iPhone and iPad | Apple Support

I’ll show you how to set up Guided Access on your iPhone or iPad so you can keep the device locked to one app.

First, open Settings, tap Accessibility, choose Guided Access, turn it on, and create a passcode or enable Face ID.

Next, review options like Time Limits, Accessibility Shortcut, and Display Auto-Lock. Then open the app you want to share, triple-click the side, top, or Home button, and choose Guided Access.

Circle areas to disable, adjust session settings for buttons, keyboard, or touch, then tap Start.

To finish later, triple-click again, enter your passcode, and tap End there.

  • Open Settings > Accessibility > Guided Access, then turn it on.
  • Set a Guided Access passcode and optionally allow Face ID.
  • Adjust options like Time Limits, Accessibility Shortcut, and Display Auto-Lock.
  • Open an app, triple-click the device button, choose Guided Access, and disable any screen areas or controls you want.
  • Tap Start to begin, then triple-click again and enter your passcode to end the session.

How to use Sound Recognition and Name Recognition on iPhone | Apple Support

I’ll show you how to set up Sound and Name Recognition on your iPhone. Start by opening Settings, choose Accessibility, then select Sound & Name Recognition.

Tap Sound Recognition, toggle it on, and wait for your device to download the available sounds. Tap Sounds, choose an alert like Door Knock, turn on recognition for that sound, and select a preferred Alert Tone.

Next, go back and tap Name Recognition to set up alerts for when your name is spoken aloud.

Tap Set Up Name Recognition, type your name, and record your pronunciation three times when prompted to finish the process.

  • Open Settings → Accessibility → Sound & Name Recognition to begin customizing your alerts.
  • Turn on Sound Recognition and choose the specific sounds you want your iPhone to listen for, like alarms or door knocks.
  • Set up a custom alert tone and haptics to play immediately whenever your device recognizes a selected sound.
  • Tap Name Recognition inside the same settings menu and type your preferred name to start personalizing vocal alerts.
  • Record your own voice pronouncing your name three times when prompted to complete the setup process.

How to set up and use Personal Voice and Live Speech on iPhone and iPad | Apple Support

I’ll show you how to create a Personal Voice and use Live Speech on iPhone. First, update iOS and find Personal Voice in Settings → Accessibility, then tap Create a Personal Voice and authenticate.

Record prompted phrases in a quiet room, use Recording or Stop at Each Phrase if needed, and preview recordings. After processing, add your Personal Voice to Live Speech under Accessibility → Live Speech.

Turn on Live Speech, add it to Control Center or Accessibility Shortcut, and save common phrases.

During conversations triple‑click the side/top button, type or pick a phrase, then tap Speak to speak aloud.

  • Update iOS, open Settings → Accessibility → Personal Voice, and authenticate to begin.
  • Record prompted phrases in a quiet room; preview and resume later if needed.
  • Let the device process recordings, then add that Personal Voice to Live Speech.
  • Enable Live Speech, add it to Control Center or Accessibility Shortcut, and store common phrases.
  • During conversations triple‑click the side/top button, type or select a saved phrase, and tap Speak.

How to take a Hearing Test and turn on the Hearing Aid feature | Apple Support

I’ll show you how to take a Hearing Test and set up the Hearing Aid feature using AirPods Pro 2+ with your iPhone.

First, update iOS and AirPods firmware and wear your AirPods. In Settings tap your AirPods, choose Take a Hearing Test, then Get Started.

Follow prompts: answer questions, confirm you’re in a quiet location, and check fit; Do Not Disturb turns on automatically.

The test plays tones left then right—tap once when you hear each. After reviewing results, tap Set up Hearing Aid if recommended, follow the setup prompts, turn it on, then customize amplification settings, left‑right balance, and tone.

  • Update iOS and AirPods firmware, wear your AirPods.
  • In Settings → AirPods → Take a Hearing Test → Get Started and follow prompts (quiet location, fit).
  • Tap once when you hear each test tone; test runs left then right; Do Not Disturb turns on.
  • Review results and, if recommended, choose Set up Hearing Aid to begin setup.
  • Turn on Hearing Aid and fine‑tune amplification, left‑right balance, tone, and other adjustments.