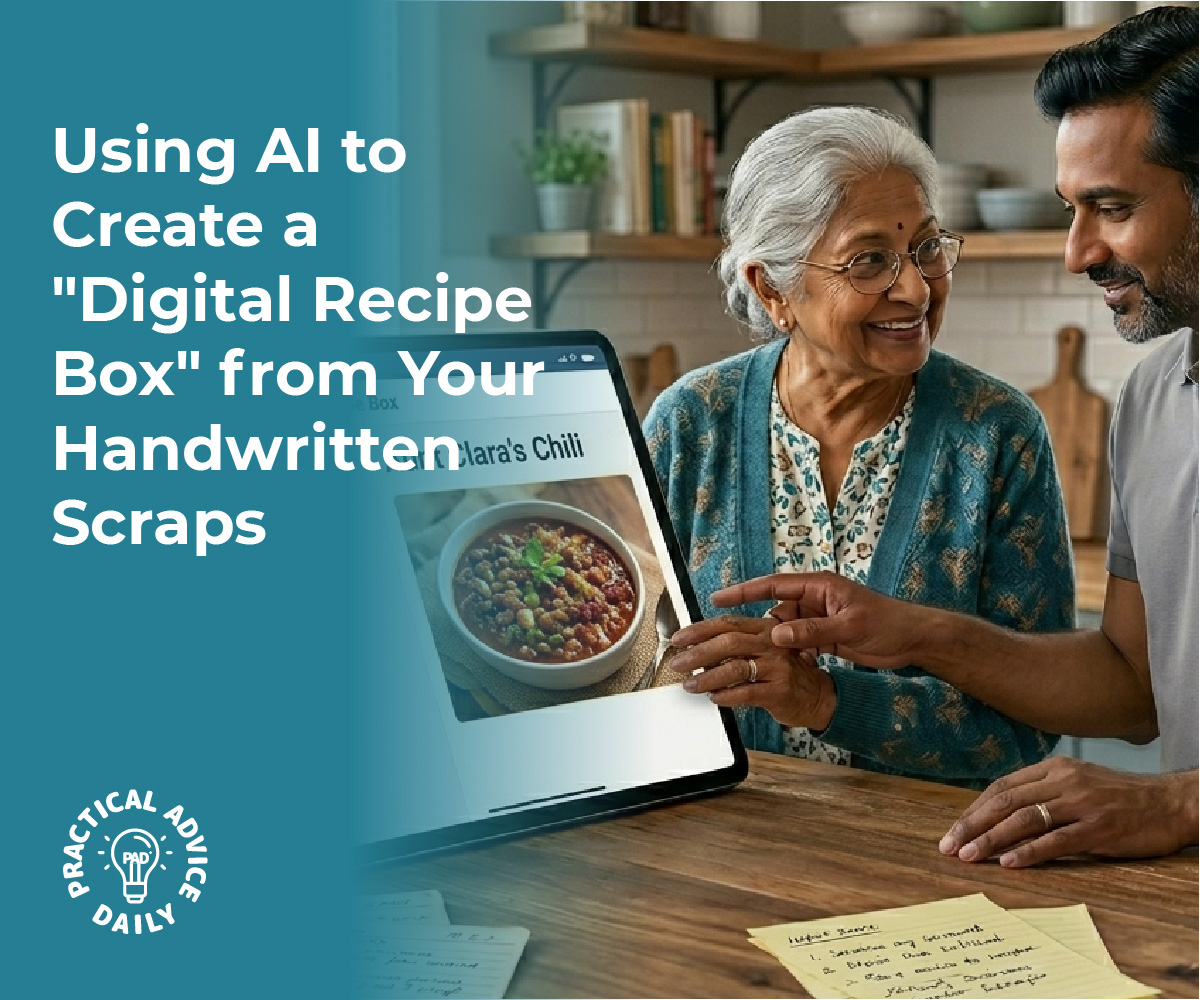
Old recipe cards often fade, stain, and curl with age, and messy cursive can make them hard to use. Modern AI on the iPhone changes that by analyzing photos of handwritten cards and turning them into clean, structured text. It separates ingredients from instructions, recognizes measurements, and organizes everything into a clear digital format.

AI-powered handwriting recognition on the iPhone can scan messy recipe cards, interpret difficult cursive, and convert them into searchable, organized digital recipes in minutes. Unlike basic OCR that struggles with irregular letters and low-contrast ink, newer AI models learn from varied handwriting styles and adapt to mixed print and cursive. Many tools also standardize measurements and store the original photo alongside the typed version.
With just a photo, anyone can build a searchable recipe collection, share it with family, and preserve older cards without retyping them line by line. The result stays editable, easy to search, and simple to store in digital folders or recipe apps.
Table of Contents
Key Takeaways
- AI on the iPhone converts messy handwritten recipe cards into structured, searchable digital text.
- Advanced handwriting recognition handles faded ink, cursive writing, and mixed text styles more accurately than basic OCR.
- Digitized recipes stay organized, editable, and easy to store or share.
Why Standard OCR Fails and How AI Revolutionizes Handwriting Recognition

Old recipe cards often mix faded ink, slanted lines, and tightly spaced cursive. Standard optical character recognition struggles with these conditions, while modern AI handwriting recognition models adapt to them through pattern learning and contextual analysis.
Challenges of Converting Cursive and Messy Handwriting
Recipe cards rarely follow clean formatting rules. Writers squeeze notes into margins, stack ingredients in uneven columns, and cross out measurements.
Cursive handwriting creates additional barriers. Letters connect, overlap, and change shape depending on the writer’s style. A single “r” can look different across words, and similar letters such as “a” and “o” often blend together.
Other common issues include:
- Ink bleed-through from the back of the card
- Faded pencil marks
- Stains and discoloration from kitchen use
- Skewed scans or angled photos from an iPhone camera
Traditional handwriting OCR systems rely on segmenting text into individual characters before recognition. When letters overlap or spacing varies, segmentation fails. As research on handwritten text recognition shows, even small distortions reduce accuracy significantly.
Messy handwriting also varies by writer. Models trained on one style may struggle with another, especially when abbreviations like “tsp.” or “c.” appear in inconsistent forms.
Optical Character Recognition vs. AI Handwriting Recognition
Optical character recognition originally focused on printed text. It detects shapes, segments them into characters, and matches them against predefined templates.
This approach works well for books and typed documents. It breaks down with handwriting.
Modern AI OCR systems use deep learning models such as convolutional and recurrent neural networks. Instead of recognizing isolated letters, they process entire words or lines as sequences. This method improves recognition of cursive handwriting and irregular spacing.
The table below highlights the difference:
| Feature | Traditional OCR | AI Handwriting Recognition |
|---|---|---|
| Designed for | Printed text | Handwritten and printed text |
| Character segmentation | Required | Often bypassed |
| Handles cursive | Poorly | Significantly better |
| Learns from data | Limited | Yes, via training datasets |
State-of-the-art AI handwriting recognition systems achieve high accuracy on structured handwriting and strong performance on cursive. Accuracy still depends on image quality and writing clarity, but AI consistently outperforms legacy handwriting OCR tools.
On an iPhone, AI models also enhance images before recognition. They correct skew, reduce noise, and normalize contrast during preprocessing.
Contextual Analysis and Layout Preservation
AI handwriting recognition does more than convert letters into text. It analyzes context.
For example, if a recipe line reads “1 c sugr,” the system can infer that “sugr” likely means “sugar” based on language models trained on common word patterns. Traditional optical character recognition treats each word independently and often preserves errors.
Modern systems also perform layout analysis. They detect:
- Ingredient lists
- Step-by-step instructions
- Titles at the top of the card
- Margin notes
Instead of flattening everything into a single text block, AI preserves structure. It keeps line breaks, groups related text, and separates headings from body content.
This structural understanding allows the iPhone to convert messy recipe cards into searchable, organized digital entries. Ingredients become indexable fields, instructions remain sequential, and annotations stay attached to the correct section.
By combining image preprocessing, sequence modeling, and contextual language analysis, AI OCR transforms handwritten recipe cards into usable digital data rather than fragmented text strings.
AI-Powered Workflow for Digitizing Handwritten Recipe Cards on iPhone

An effective workflow combines high-quality image capture, AI-powered OCR, and structured organization. Each step focuses on accuracy, readability, and long-term searchability within a digital recipe library.
Capturing and Uploading Images
He starts with the iPhone camera, not a flatbed scanner. The built-in camera offers strong resolution, automatic focus, and exposure control that work well for faded ink and uneven paper.
He places the recipe card on a flat, neutral background and shoots in natural light. Overhead lighting reduces shadows, while tapping the screen locks focus on the text.
Best practices for image capture:
- Keep the card fully inside the frame
- Avoid glare from plastic sleeves
- Use the iPhone’s grid feature to align edges
- Capture both front and back if notes appear on both sides
After capturing the image, he uploads it into a handwriting recognition tool or recipe scanning app that supports AI-powered OCR. Many modern apps accept single images or bulk uploads directly from the Photos app.
Clear, sharp images improve handwriting OCR accuracy and reduce correction time later.
Handwriting to Text Conversion Steps
Once uploaded, the AI-powered OCR engine begins handwriting to text conversion. It analyzes letter shapes, spacing, and word patterns rather than relying on simple character matching.
Advanced handwriting recognition tools use layout analysis to distinguish between ingredient lists, numbered steps, and side notes. This step prevents the system from mixing instructions with measurements.
The typical conversion process follows this structure:
- Image preprocessing – enhances contrast and sharpens faded ink
- Text detection – identifies lines, columns, and text blocks
- Handwriting OCR – converts script into machine-readable text
- Post-processing – corrects spelling using context and food vocabulary
He reviews the draft text immediately after conversion. AI performs well, but older cards with cursive writing, abbreviations, or stains may require small edits.
Corrections made at this stage improve search accuracy later.
Maintaining Recipe Structure and Formatting
Raw text alone does not create a usable digital recipe. Structure determines whether the file becomes searchable and organized.
AI systems trained for recipes automatically separate:
- Title
- Ingredients
- Measurements
- Instructions
- Prep and cook times
- Tags or categories
Layout analysis plays a key role here. If the original card places ingredients in a left column and steps on the right, the AI detects that visual separation and preserves logical groupings.
He confirms that ingredient lines remain distinct from instruction sentences. Structured formatting allows the iPhone app to index recipes by ingredient, cuisine type, or cooking method.
Consistent formatting also prepares the collection for export into a searchable family cookbook, PDF, or recipe manager.
Batch Processing for a Family Cookbook
When digitizing dozens or hundreds of cards, batch processing saves time. Many handwriting recognition tools allow multiple images to upload simultaneously.
He groups cards by family member, decade, or meal type before uploading. Organized batches reduce sorting work later.
A structured workflow often looks like this:
| Step | Action | Purpose |
|---|---|---|
| 1 | Photograph 20–30 cards | Maintain consistent lighting |
| 2 | Upload as a batch | Enable automated processing |
| 3 | Run AI-powered OCR | Convert handwriting to text |
| 4 | Review and correct | Ensure accuracy |
| 5 | Tag and categorize | Prepare for searchable archive |
Batch processing ensures consistent formatting across the entire collection.
With structured metadata and accurate handwriting to text conversion, the digital archive evolves into a clean, searchable family cookbook accessible directly from the iPhone.
Top AI Tools and Customization for Recipe Digitization
Several AI handwriting recognition tools can read faded ink, slanted cursive, and shorthand on old recipe cards directly from an iPhone photo. The right platform and the right level of customization determine how accurate and searchable the final digital recipe becomes.
Overview of Leading Platforms (Transkribus and Others)
Transkribus stands out for difficult handwriting and historical documents. It uses Handwritten Text Recognition (HTR) rather than basic handwriting OCR, which improves accuracy on cursive, uneven spacing, and aged paper.
Users can upload JPEG, PNG, or PDF files, including photos taken on an iPhone. The platform supports over 100 languages and provides access to more than 140 pre-trained models.
Other tools focus on consumer convenience. Apps such as OrganizEat, RecipeScan, and similar AI recipe scanners emphasize quick photo capture and automatic structuring into title, ingredients, and steps. These tools prioritize speed and built-in organization over deep model control.
For clean, modern handwriting, mobile-first apps often deliver acceptable results in seconds. For tightly packed cursive or 1940s recipe cards with fading ink, Transkribus or similar advanced handwriting recognition tools provide more reliable transcription.
Custom Model Training for Unique Handwriting Styles
Old family recipe cards often reflect one person’s unique style. Letters may blend together, abbreviations may appear frequently, and ingredient lists may follow nonstandard formats.
Transkribus allows custom model training, which improves recognition of these patterns. A user can manually correct 20–30 pages of transcription and use them as “ground truth” data to train a personalized model.
This process teaches the system to recognize recurring quirks, such as:
- A looped “g” that resembles a “y”
- Abbreviations like “tspn” or “sm can”
- Nonstandard spacing between fractions
Character Error Rate (CER) helps measure improvement. A lower CER means fewer transcription mistakes per line of text.
Custom training requires more effort than standard OCR, but it produces more stable results for large recipe collections written by the same person.
Ensuring Searchability and Organization of Digital Recipes
Accurate transcription matters, but structure determines usability. A searchable digital format requires more than a block of text.
Many recipe-focused apps automatically separate:
- Title
- Ingredients list
- Step-by-step instructions
- Prep and cook time (when detectable)
This structured output allows keyword searches such as “chocolate,” “slow cooker,” or “under 30 minutes.” It also supports tagging by category, such as dessert, holiday, or vegetarian.
Transkribus exports files in formats like JSON or XML, which developers or advanced users can import into recipe management systems. This approach suits users building a long-term archive rather than a simple mobile cookbook.
Clear photos, manual review of measurements, and consistent tagging ensure that old handwritten recipes become fully searchable, filterable, and usable on an iPhone.
Practical Benefits and Future Trends in AI Handwriting Digitization
AI OCR on the iPhone turns fragile recipe cards into structured, searchable text. It protects family history, improves access, and introduces new tools for organizing and safeguarding handwritten content.
Preserving Culinary Heritage
Old recipe cards often fade, tear, or stain with use. Converting them with handwriting to text tools preserves both the instructions and the personal notes written in the margins.
AI OCR models trained on diverse handwriting styles can interpret cursive, uneven spacing, and ink bleed common in decades-old cards. When scanned with an iPhone camera, the system enhances contrast, detects text lines, and converts them into editable digital entries.
Families can then compile a structured family cookbook with standardized ingredient lists, measurements, and cooking times. They can also store the original scanned image alongside the converted text, preserving visual details such as handwriting style and annotations.
This process reduces the risk of permanent loss from fire, water damage, or simple aging. It also ensures that recipes passed down informally remain usable for future generations.
Accessibility, Sharing, and Editing
Digitized recipes become instantly searchable by keyword, ingredient, or category. Instead of flipping through boxes, users can search for “cinnamon” or “holiday desserts” in seconds.
AI OCR converts handwriting to text that integrates with Notes, Files, or dedicated recipe apps on the iPhone. Once in digital form, users can:
- Edit measurements or correct recognition errors
- Scale servings automatically
- Tag recipes by cuisine or occasion
- Share instantly through email or messaging
Digital text also improves accessibility. Screen readers can read converted recipes aloud, supporting users with visual impairments. Larger fonts and high-contrast display settings further increase usability.
As AI models improve, handwriting recognition accuracy continues to rise, especially for mixed layouts that include printed clippings and handwritten notes on the same card. Future updates will likely offer stronger automatic formatting, such as detecting ingredient lists separately from preparation steps.
Security and Privacy Considerations
Recipe cards may seem harmless, but they often contain personal notes, family names, and historical details. Users should consider how apps handle uploaded images and converted text.
Dedicated AI OCR services typically process documents securely and limit data retention. Some systems explicitly state that they do not use uploaded content for model training, which reduces privacy risk.
When choosing an iPhone app or cloud-based handwriting to text service, users should review:
| Factor | What to Check |
|---|---|
| Data storage | Is content stored locally or in the cloud? |
| Retention policy | How long does the service keep images? |
| Encryption | Is data encrypted in transit and at rest? |
| Account control | Can users delete scans permanently? |
On-device processing offers an added layer of control because the image never leaves the phone. As mobile processors grow more capable, more AI OCR features will run locally, balancing convenience with privacy.
Final Thoughts
Digitizing old family recipes is about more than just clearing kitchen clutter; it’s about preserving your culinary heritage for generations to come. By using AI on your iPhone to transform faded, handwritten cards into clear digital text, you ensure that a grandmother’s famous pie or a father’s secret sauce is never lost to time or messy handwriting.
What used to take hours of tedious retyping can now be done in minutes with a simple photo. These smart tools do the heavy lifting—organizing ingredients, fixing unreadable cursive, and making your entire collection searchable with a single tap. Once your recipes are digital, they are easy to share with family, simple to edit, and safe from the wear and tear of a busy kitchen.