How to Control What AI Learns From You on Your iPhone

Your iPhone’s built-in AI, like Siri and other smart features, learns from how you use your device. This helps make suggestions, reminders, and searches more personal and useful. But you might not always want your data used for that. The good news is, Apple gives you clear tools to control what information stays private and what gets used to improve your experience.

In this guide, we’ll walk through the simple steps to manage what Siri, Apple’s AI, and your iPhone collect or learn about you. No tech experience needed—just follow along, and you’ll feel confident protecting your privacy.

Table of Contents

Key Takeaways

  • You can control what Siri remembers and how it personalizes suggestions.
  • Apple processes most AI features directly on your iPhone, not in the cloud.
  • You can delete Siri and Dictation history at any time.
  • Turning off certain personalization settings won’t stop Siri from working—it just makes it less customized.
  • All settings are found under Settings > Siri & Search and Settings > Privacy & Security.

How Siri and iPhone AI Learn From You

Your iPhone quietly learns from your habits. For example:

  • Siri Suggestions may show shortcuts or reminders based on your daily routines.
  • Keyboard predictions improve as you type.
  • Photos might automatically organize pictures of people or places you often view.

All this data helps make your phone smarter—but it’s designed to stay private. Apple’s “on-device processing” means most learning happens right on your iPhone, not on Apple’s servers. Still, you can manage or delete this data whenever you like.

Step 1: Review Siri & Search Settings

  1. Open the Settings app.
  2. Tap Siri & Search.
  3. Here, you can control how Siri interacts with your information:
    • Listen for “Hey Siri”: Turn this off if you don’t want Siri always listening for voice commands.
    • Show in Search / Show Suggestions: You can toggle these off for specific apps if you don’t want Siri suggesting content from them.
    • Learn from this App: When off, Siri won’t analyze how you use that app.

You can go through each app listed and decide where you’re comfortable allowing suggestions or learning.

Step 2: Manage Siri’s Personal Data

Even though Apple keeps Siri data private, you can remove any stored interactions.

  1. Go to Settings > Siri & Search > Siri & Dictation History.
  2. Tap Delete Siri & Dictation History.

This clears your voice interactions and AI-generated learning from Apple’s servers. It’s a good habit to do this occasionally—especially if you’ve been testing Siri or using dictation a lot.

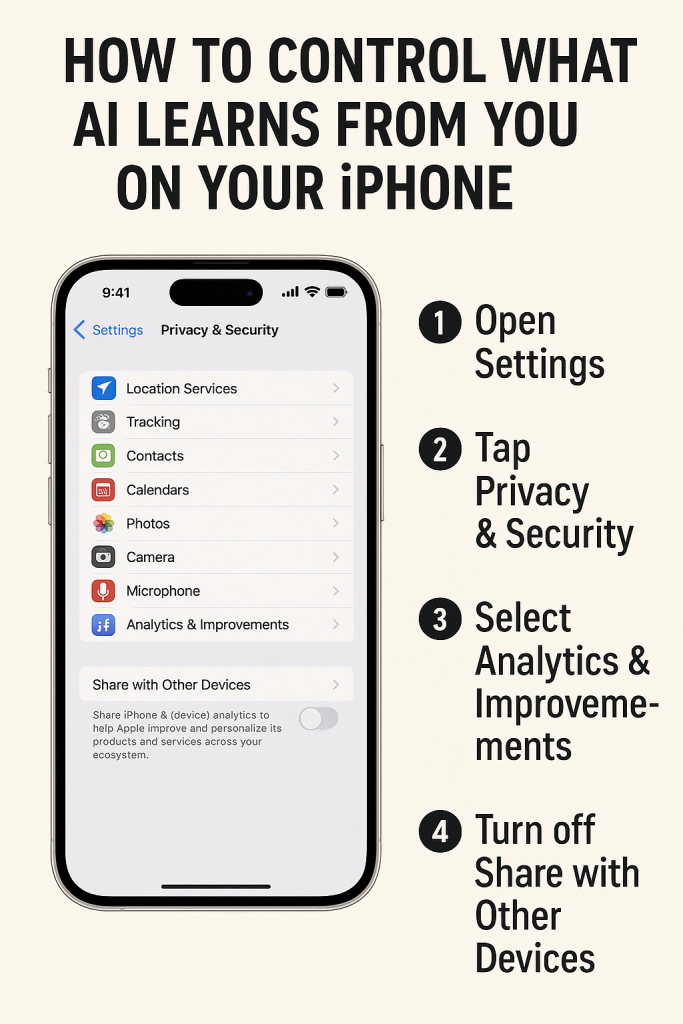
Step 3: Adjust Personalization and Privacy Settings

  1. Go to Settings > Privacy & Security.
  2. Scroll to Analytics & Improvements.
  3. You can turn off:
    • Share iPhone Analytics
    • Improve Siri & Dictation
    • Share iCloud Analytics

Turning these off stops your iPhone from sending anonymous usage data to Apple. Your device will still work just fine—these settings simply reduce how much information is shared.

Step 4: Control App Permissions

AI can also learn from how apps use your data. Take a few minutes to review which apps have access to your location, microphone, photos, or contacts.

  1. Go to Settings > Privacy & Security.
  2. Tap each category (like Location Services, Microphone, Photos).
  3. For any app you don’t fully trust, choose Ask Next Time or Never.

This gives you more control and ensures only the apps you want have access to sensitive data.

Step 5: Check iCloud and Apple Intelligence Features

If you’re using Apple Intelligence (Apple’s name for its newer AI features), it’s worth understanding how it handles privacy:

  • Apple Intelligence uses Private Cloud Compute, which means even when your data is sent to Apple’s servers, it’s done securely and anonymously.
  • You can manage AI features in Settings > Siri & Search > Apple Intelligence (available on newer iPhone models).
  • Here you can turn off specific features like writing tools, summaries, or personalized suggestions if you prefer not to use them.

Real-Life Example

Imagine you often text your daughter every evening. Siri might start suggesting her name in Messages automatically around that time. If you find that too personal, you can go to Settings > Siri & Search > Messages and toggle off Show Suggestions. Siri will stop making that guess while still letting you send messages normally.

Step 6: Reset Personalized Learning (Optional)

If you ever want to start fresh:

  1. Go to Settings > General > Transfer or Reset iPhone.
  2. Tap Reset.
  3. Choose Reset Keyboard Dictionary or Reset Location & Privacy depending on what you’d like to clear.

This erases learned behavior, predictions, and preferences—almost like giving your iPhone a clean slate without deleting your apps or files.

Final Thoughts

You don’t need to give up convenience to protect your privacy. Apple’s approach to AI puts you in charge, allowing you to fine-tune how much your iPhone learns from you. By checking these settings once in a while, you’ll know exactly what’s happening behind the scenes—and feel more confident using your device.

Remember, privacy isn’t about saying “no” to technology. It’s about choosing what works best for you. With these tools, your iPhone can stay both smart and secure.

Categories AI

How to take a screenshot and record the screen on your Mac | Apple Support

To capture your Mac screen, start by taking a screenshot using keyboard shortcuts. Press Shift + Command + 3 to capture the entire screen, and a thumbnail will appear in the bottom right for immediate editing or sharing, or it will save to your desktop. For a portion of the screen, press Shift + Command + 4, drag to select the area, and release to capture; press Escape to cancel. To capture a specific window, use Shift + Command + 4, then press the Spacebar to change the cursor to a camera, click the window to capture it. For screen recording, press Shift + Command + 5 to open the screenshot toolbar, choose to record the entire screen or a selected portion, click Record, and stop with Command + Control + Escape. Your recording will appear as a thumbnail for immediate editing or saving.

Summary:
– To capture the entire screen on a Mac, press Shift + Command + 3; a thumbnail appears for immediate editing or saves to the desktop.
– For a portion of the screen, press Shift + Command + 4, then click and drag to select the area.
– To capture a specific window, press Shift + Command + 4, then Spacebar, and click the window.
– For screen recording, press Shift + Command + 5, choose to record the entire screen or a portion, and click Record.
– Stop recording with Command + Control + Escape; the recording appears as a thumbnail for immediate action or saves to the desktop.

5 helpful tips for using your iPhone and Mac together | Apple Support

To make the most of Continuity between your iPhone and Mac, first ensure both devices are updated to the latest software, signed in with the same Apple ID, and have Handoff, Bluetooth, and Wi-Fi enabled. Use Universal Clipboard to copy text or images on your iPhone and paste them on your Mac. To sync Focus settings across devices, turn it on via the Control Center. Share files using AirDrop by selecting and sending them to your Mac, where they will appear in the Downloads folder. For scanning, use your iPhone’s camera within a Mac app to add documents directly. Lastly, add your favorite iPhone widgets to your Mac desktop through the widget gallery for easy access.

Summary:
– Ensure both your iPhone and Mac are updated, signed in with the same Apple ID, and have Handoff, Bluetooth, and Wi-Fi enabled to use Continuity features.
– Use Universal Clipboard to copy text or images on your iPhone and paste them on your Mac.
– Sync Focus settings across devices by turning it on via the Control Center on your iPhone or Mac.
Use AirDrop to transfer files between your iPhone and Mac quickly, with items appearing in the Downloads folder on your Mac.
Scan documents using your iPhone’s camera directly within a compatible Mac app, and add iPhone widgets to your Mac desktop for easy access.

Does AI Spy on You? What iPhone Users Should Know About Data Privacy

If you’ve ever wondered whether your iPhone’s AI is “spying” on you, you’re not alone. As artificial intelligence becomes part of everyday apps—helping with photos, typing, or Siri—many people are asking what happens to all that personal information.

The good news is that Apple’s approach to AI is quite different from what you may have heard about other tech companies. This article breaks down, in simple terms, how Apple protects your privacy, what “on-device intelligence” means, and how to make sure your data stays secure.

Table of Contents

Key Takeaways

  • Apple designs AI with privacy first. Most AI tasks happen directly on your iPhone, not on distant servers.
  • Your personal data stays private. Apple uses a system called “on-device processing” to avoid storing your data in the cloud whenever possible.
  • Private Cloud Compute adds protection. When your phone does need help from Apple’s servers, it uses a special privacy layer that keeps your data anonymous.
  • You’re in control. You can review, limit, or turn off AI features anytime in your Settings.

How Apple’s AI Works Differently

Unlike many tech companies that rely heavily on internet servers to run AI, Apple tries to keep as much processing as possible right on your device.

When you use features like:

  • Siri suggestions
  • Photo recognition (like finding “beach” or “dog” photos)
  • Text predictions while typing
  • Voice transcription

…your iPhone’s built-in chips do most of the work locally. This means that your photos, messages, or voice recordings usually never leave your phone.

This system is called on-device intelligence. It’s a core part of Apple’s privacy philosophy: your personal data should stay personal.

What About Apple’s New “Apple Intelligence”?

With the latest updates (starting from iOS 18 and newer devices like iPhone 15 Pro and beyond), Apple introduced Apple Intelligence—a new generation of AI features.

These features can rewrite emails, summarize notifications, or even understand your photos in smarter ways. But again, privacy is built in from the start.

Here’s how Apple keeps it safe:

  1. On-device first: Your iPhone handles most AI tasks locally using its advanced neural chip.
  2. Private Cloud Compute: If your device needs extra processing power, it sends only what’s necessary to Apple’s secure servers. These servers don’t store or access your personal data—they’re designed so even Apple can’t see what you sent.
  3. Transparency and control: You’ll always know when Apple Intelligence is active and can choose to disable it.

This combination helps Apple offer powerful AI tools without creating a privacy trade-off.

How It Compares to Other Platforms

Other AI assistants—like those from Google or Amazon—often depend on large cloud-based models that process user data on company servers.

This can mean your voice recordings, search history, or interactions are analyzed online to improve their services. While these companies have their own privacy protections, it still means your information travels outside your device.

Apple, by contrast, takes the slower but safer path:

  • It minimizes data collection.
  • It anonymizes any information that must leave your iPhone.
  • It doesn’t use your data to train broad AI models that serve everyone.

That’s why, when Apple introduces a new feature like Siri rewriting messages or summarizing your day, it emphasizes that the feature learns from your habits without creating a user profile that’s shared or stored anywhere else.

Simple Ways to Check and Control Your Privacy

You don’t need to be tech-savvy to make sure your iPhone’s privacy settings are working for you. Here’s what to do:

  1. Go to Settings > Privacy & Security. Review which apps have access to your photos, microphone, and location.
  2. Check Siri & Search settings. You can control whether Siri learns from certain apps or stores your requests.
  3. Manage analytics and personalization. Under Privacy settings, you can turn off “Improve Siri & Dictation” if you prefer not to share voice samples.
  4. Review new AI permissions. With iOS 18 and beyond, you’ll be asked for permission before using Apple Intelligence features. Read those prompts carefully.

Apple also publishes an easy-to-read privacy label for most apps, showing what data (if any) is collected and why.

Real-Life Example: Photo Recognition

Let’s say you open your Photos app and type “dog.” Instantly, your iPhone shows all pictures with dogs.

That might sound like something that requires cloud computing, but in Apple’s case, the photo recognition happens entirely on your phone. No photos are uploaded for analysis.

By keeping this process local, Apple prevents sensitive images—like family gatherings, medical photos, or documents—from leaving your device.

Why This Matters

Privacy might not always seem urgent, but AI systems depend on large amounts of data. When that data includes personal moments, voice recordings, or photos, privacy protections become critical.

Apple’s model shows that AI doesn’t have to mean giving up control. It’s proof that you can have smart, helpful features without being constantly watched or tracked.

Final Thoughts

So, does AI spy on you? In many cases, it can—but not on your iPhone.

Apple’s privacy-first design means your AI tools work for you, not on you. Most of what happens with Siri, Photos, or Apple Intelligence stays right on your device, protected by layers of encryption and transparency.

If you take a few minutes to review your settings and understand how Apple’s AI works, you’ll feel confident using these tools knowing your personal world stays private. Curious to learn more? Check Apple’s official Privacy Page for plain-language explanations and updates about how your data is protected.

Categories AI

How to use your Apple Watch | Apple Support

To familiarize yourself with your Apple Watch and its useful gestures and features in watchOS, start by responding to notifications with a tap on your wrist. To respond immediately, raise your wrist and tap the app drawer to share your location or send an emoji. Access Notification Center by swiping down from the top of your watch face to view and manage notifications. Use Control Center to toggle Do Not Disturb or find your iPhone by pressing the side button. View your apps by pressing the Digital Crown, and access recent apps with a double-click. Customize watch faces by holding the watch face and using Siri for reminders. Emergency calls can be made by holding the side button and dragging the emergency call slider. Explore more features by subscribing to the Apple Support YouTube channel.

Summary:
– To respond to notifications, raise your wrist and use the app drawer to share your location or send an emoji; access Notification Center by swiping down from the top of your watch face.
– Open Control Center by pressing the side button to quickly toggle settings like Do Not Disturb or find your iPhone.
– Access apps by pressing the Digital Crown and view recent apps with a double-click.
– Customize watch faces by holding the current face and using the options to edit or change faces; use Siri for setting reminders.
– Make emergency calls by holding the side button and dragging the emergency call slider.

How to customize the Action button on Apple Watch Ultra | Apple Support

To customize the Action Button on your Apple Watch Ultra, open the Apple Watch app on your iPhone and tap on the “Action Button” option. From the action menu, you can select a new function for the button. Available choices include starting a workout, using the stopwatch, creating a Compass Waypoint, or using Backtrack to retrace your steps if you get lost. You can also start a dive session or turn on the flashlight. This customization allows you to tailor the Action Button to suit your needs, enhancing the functionality of your Apple Watch Ultra.

Summary:
Open the Apple Watch app on your iPhone to customize the Action Button on the Apple Watch Ultra.
– Tap “Action Button” and choose a new function from the action menu.
– Available actions include starting a workout, using the stopwatch, or creating a Compass Waypoint.
– You can also use Backtrack to retrace your steps, start a dive session, or turn on the flashlight.
– Customizing the Action Button enhances the functionality of your Apple Watch Ultra to better suit your needs.

The Secret Behind Siri’s New AI Upgrades: What’s Actually Different?

If you’ve ever used Siri to set a timer, check the weather, or send a quick message, you might have noticed that Apple’s voice assistant feels smarter lately. That’s because Siri recently got a big AI upgrade. But what exactly does that mean?

In this easy-to-follow guide, we’ll look at how Apple’s new artificial intelligence features make Siri more natural, more useful, and—finally—better at understanding what you actually mean. Don’t worry, we’ll skip the tech jargon and keep things simple.

Table of Contents

Key Takeaways

  • Siri can now understand more natural, conversational speech.
  • The new AI helps Siri handle follow-up questions and complex requests.
  • On-device intelligence means faster responses and more privacy.
  • Siri works better with apps, messages, and daily reminders.
  • You’ll see these changes in iOS 18 and newer Apple devices.

What’s New with Siri’s AI

Apple’s new AI system, called “Apple Intelligence,” powers the biggest upgrade Siri has ever had. Instead of only responding to short commands like “Call Mom,” Siri now understands the meaning behind your requests.

For example:

  • You can say, “Remind me to call Mom when I get home,” and Siri will know to set that reminder for your location.
  • If you follow up with, “Oh, and send her the photo from dinner,” Siri understands you’re still talking about Mom and finds that picture for you.

This type of understanding—where Siri connects ideas and context—is what Apple’s new AI brings to the table.

More Natural Conversations

Before, Siri worked best when you spoke in short, robotic commands. Now, you can talk to it more like a real person. You can pause, change your mind, or add details, and Siri will keep up.

Example:

  • You: “Hey Siri, text Sarah… actually, wait—make that Jane. Tell her I’ll be five minutes late.”
  • Siri: “Okay, I’ll text Jane that you’ll be five minutes late.”

No need to start over or rephrase everything. This smoother conversation style makes Siri much easier to use.

Better Understanding of Context

Siri can now keep track of what you’re talking about, even across different questions. If you ask:

  • “What’s the weather like in Paris?”
    and then say,
  • “How about Rome?”

Siri knows you’re still talking about weather, without needing you to repeat it.

This is part of Apple’s new “context awareness” ability. It may sound small, but it’s what makes Siri feel more human and less like a machine.

Works Seamlessly with Apps

Another improvement is how well Siri interacts with your apps. It can now open documents, find photos, or summarize emails—all using simple voice commands.

Try saying:

  • “Show me the photos I took at the beach last weekend.”
  • “Find the note I made about the plumber.”
  • “Summarize the last email from my doctor.”

Siri uses AI to pull the right information from your apps quickly and privately.

Privacy First

One of the biggest differences between Apple’s AI and others is how it handles your personal data. Apple processes most requests directly on your device, which means your private information—like messages, photos, and notes—stays with you.

For more complex tasks, Siri may use secure cloud processing, but Apple promises this data isn’t stored or shared. This approach blends powerful AI with strong privacy protection, something many users appreciate.

Faster and More Reliable

Because Siri now uses on-device intelligence, it responds more quickly than before. You’ll notice fewer “Let me check on that” delays. Everyday requests—like setting alarms or checking your calendar—feel almost instant.

And if you’re offline, Siri can still handle many tasks, such as controlling settings or opening apps, without needing an internet connection.

Real-Life Example: Planning Your Day

Let’s say you want to plan a busy morning. With the new Siri, you could simply say:
“Hey Siri, what’s on my calendar tomorrow morning?”
Then follow with:
“Move my doctor’s appointment to later in the day.”
And then,
“Text my sister that I’ll be free for lunch.”

Siri now understands all these connected requests as part of one conversation—saving you time and taps.

Final Thoughts

Apple’s latest AI upgrades finally make Siri feel like the smart assistant it was always meant to be. It’s friendlier, faster, and better at understanding what you mean instead of just what you say.

Whether you’re sending messages, organizing your day, or searching your photos, Siri’s new intelligence makes your iPhone, iPad, or Mac even more helpful—without giving up your privacy.

If you haven’t updated your device yet, it’s worth checking for the latest version of iOS or macOS to try the new Siri for yourself. You might be pleasantly surprised at just how natural talking to your device now feels.

Categories AI

How to use AssistiveTouch on Apple Watch | Apple Support

With Assistive Touch on Apple Watch, you can use hand gestures instead of the touchscreen to navigate and perform actions. To enable it, go to Accessibility settings on your Apple Watch or the Apple Watch app on your iPhone, then turn on Assistive Touch. Customize gestures like pinching your thumb and pointer finger to move forward, double pinching to go back, clenching your fist to select, and double clenching to open the action menu for tasks like scrolling. When Assistive Touch is active, a blue ring appears around the screen, allowing you to navigate notifications and perform quick actions with ease.

Summary:
– Enable Assistive Touch on your Apple Watch or through the Apple Watch app on your iPhone by accessing the Accessibility settings.
– Customize hand gestures: pinch to move forward, double pinch to go back, clench to select an item, and double clench to open the action menu.
– The action menu allows complex actions like scrolling or pressing the digital crown.
– A blue ring indicates that Assistive Touch is active, allowing gesture navigation and quick actions.
– Use gestures to navigate notifications and perform actions like answering calls or stopping timers with double pinches.

How to Use AI to Write Polite Replies or Messages Automatically

We’ve all been there—wanting to send a polite reply but not quite sure how to word it. Whether it’s answering an email, replying to a text, or jotting a quick note, finding the right tone can take time. The good news is, your phone or computer can help.

In this guide, you’ll learn how to use AI tools to write polite, friendly messages automatically. You don’t need any special skills—just your everyday apps like Messages, Mail, and Notes.

Table of Contents

Key Takeaways

  • AI can help you write polite, natural-sounding replies quickly.
  • Tools like Apple’s Smart Reply, Gmail’s Smart Compose, and Notes with AI suggestions make writing easier.
  • You can personalize the AI’s tone to sound more like you.
  • It’s still important to review messages before sending.

Understanding AI-Powered Replies

AI (Artificial Intelligence) can “read” your message or email and suggest a thoughtful reply based on the context. For example:

  • If a friend texts, “Want to meet for coffee later?” your phone might suggest “Sure, what time works for you?”
  • In email, AI might suggest polite responses like “Thank you for reaching out” or “I appreciate your help.”

These suggestions save time while helping you sound professional or kind—especially if writing doesn’t come naturally or you’re in a rush.

How to Use AI for Polite Replies

Let’s look at how you can use AI in your everyday apps.

1. In Messages (iPhone or Android)

For iPhone users:

  • Open Messages and start a conversation.
  • When someone texts, look above your keyboard. You might see suggestions such as “Sure!”, “Sounds great,” or “Thank you!”
  • Tap a suggestion to send it instantly, or edit it slightly to add your personal touch.

Example:
Your friend says: “I’ll pick you up at 6.”
Suggested reply: “Thanks! See you then.”

Tip:
If you use Apple’s Predictive Text or Siri Suggestions, it learns from your past conversations to offer polite phrases that sound more like you.

For Android users:

  • Open your Messages app.
  • When you get a message, look for Smart Reply suggestions like “Thanks,” “Got it,” or “Talk soon.”
  • Tap the one that fits.

You can also use Google Assistant to write longer messages. Try saying, “Hey Google, reply politely to this message.”

2. In Mail (Apple Mail, Gmail, or Outlook)

Apple Mail (on iPhone or Mac):

  • Open an email and tap Reply.
  • If you’re using iOS 18 or macOS Sequoia, you may see an AI Reply button (a sparkle icon ✨).
  • Tap it to see suggested replies like “Thank you for your message” or “That sounds good to me.”
  • You can edit or ask it to make the tone “more polite,” “more casual,” or “shorter.”

Gmail:

  • When replying to an email, you’ll often see Smart Reply buttons at the bottom (for example: “Sounds good,” “Thanks for letting me know,” or “I’ll get back to you soon.”).
  • You can also turn on Smart Compose in Settings, which helps you finish sentences politely as you type.

Example:
You type: “Thank you for your…”
Smart Compose may suggest “time and consideration.”

Outlook:

  • Microsoft’s Copilot or built-in AI reply can summarize emails and suggest polite responses like “Thanks for the update” or “I’ll review and follow up.”

Tip:
Even if the AI suggests the words, you remain in control. Always read the message before sending to be sure it feels right for your situation.

3. In Notes (Apple Notes or Google Keep)

AI can also help you draft messages before you send them. This is great if you want to sound polite but need to think through what to say.

Apple Notes with AI (iOS 18 and later):

  • Open a new note.
  • Tap the sparkle icon (✨) to open the AI writing helper.
  • Type something like: “Write a polite thank-you message for a neighbor who helped me with groceries.”
  • The AI will suggest a short message. You can tap Refine to make it more friendly, shorter, or more formal.

Example Result:

“Thank you so much for helping me with my groceries yesterday. I really appreciate your kindness!”

You can copy that into a text or email and send it off.

Google Keep users:
While Keep doesn’t yet have built-in AI writing, you can use Google’s Gemini (previously Bard) to draft polite notes or messages and paste them into your Keep app for later.

Helpful Tips for Using AI Replies

  • Add a human touch. Even if AI writes most of your message, adding a personal line (like a name or a short note) makes it warmer.
  • Review before sending. AI isn’t perfect—it might sound too formal or too casual. Adjust as needed.
  • Practice makes perfect. The more you use predictive or smart replies, the better your device gets at matching your tone.
  • Stay polite, but be yourself. It’s okay to change the words until they feel like your own voice.

Real-Life Example

Imagine you’re tired after a long day, and someone emails asking for a quick favor. Instead of ignoring it, you can use AI to help craft a gentle response.

Prompt to AI (in Notes or Mail):

“Write a polite reply to someone asking for help, but I’m busy this week.”

AI suggestion:

“Thank you for reaching out! I’d love to help, but I’m tied up this week. Let’s reconnect next week if that works for you.”

That saves you time and keeps your communication kind and professional.

Final Thoughts

Using AI to write polite messages isn’t about replacing your words—it’s about helping you express them more easily. Whether it’s a simple “thank you” or a professional email, AI can give you a thoughtful starting point.

With a few taps, you can sound kind, confident, and clear without overthinking every reply. Try exploring the built-in AI features in your Messages, Mail, and Notes apps—you might be surprised at how helpful and natural they feel.

Categories AI

10 helpful Apple Watch tips you should know | Apple Support

To make the most of your Apple Watch, here are some key tips to get you started. In watchOS 10, access the flashlight by pressing the side button in Control Center, allowing you to choose between steady or flashing lights. Pin widgets to your Smart Stack by scrolling with the digital crown and holding your preferred widget. Locate your iPhone by tapping the Ping button in Control Center, or use the Camera Remote app to take photos with your iPhone. Enable Apple Watch mirroring via iPhone settings for on-screen navigation. Additionally, manage multiple timers in the Timer app, take screenshots, and use voice dictation for text replies.

Summary:
– Access the flashlight in watchOS 10 by pressing the side button in Control Center, with options for steady or flashing lights.
– Pin widgets to your Smart Stack by scrolling with the digital crown, holding the widget, and selecting the pin option.
Locate your iPhone by tapping the Ping button in Control Center, or use the Camera Remote app to take photos remotely with your iPhone.
– Enable Apple Watch mirroring via iPhone settings under Accessibility for on-screen navigation of your watch.
– Manage multiple timers in the Timer app, take screenshots, and use voice dictation for text replies directly from your Apple Watch.