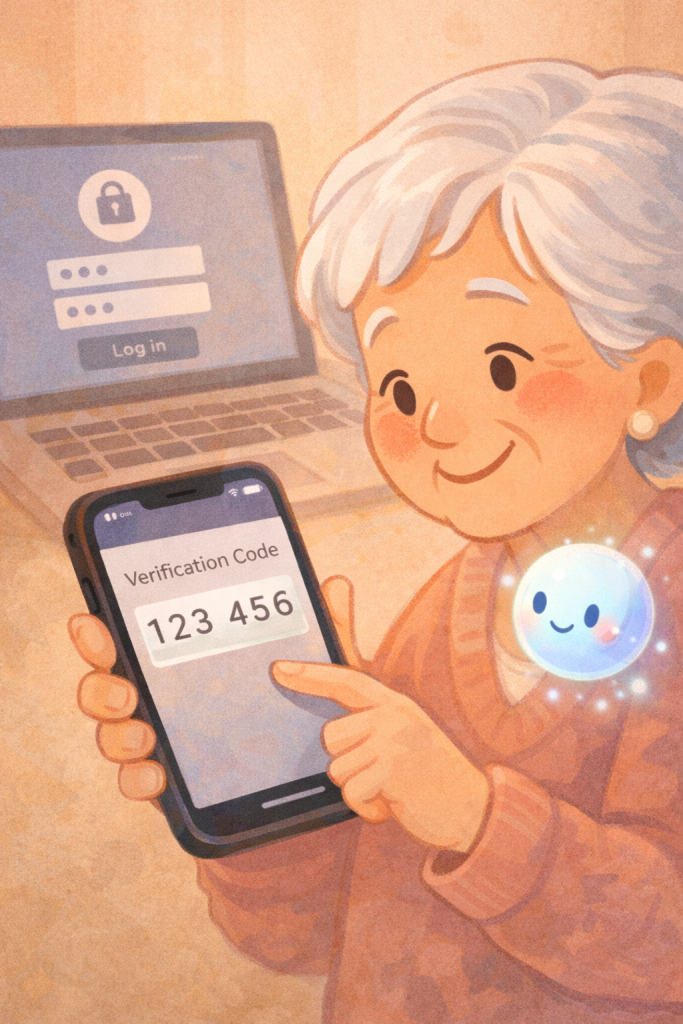
Get to know accessibility features on Apple Vision Pro | Apple Support

To personalize accessibility features on your Apple Vision Pro, start by accessing Settings from Home View, then navigate to Accessibility. In the Accessibility menu, scroll to the Physical and Motor section and explore options like Dwell Control, which allows interaction without hand gestures, and Pointer Control, using head position or hand movements. For quick access, go to Accessibility Shortcut in Settings, select the features you want to add such as Assistive Touch or Pointer Control, and close Settings. You can then triple-click the Digital Crown to activate these features easily. Explore further settings to address various vision, motor, hearing, and learning needs.

Summary:
Access Accessibility settings from Home View by opening Settings.
– Enable features like Dwell Control and Pointer Control in the Physical and Motor section.
– Add Assistive Touch and Pointer Control to your Accessibility Shortcut.
– Triple-click the Digital Crown to quickly access these features.
– Explore additional settings to support vision, motor, hearing, and learning needs.

How to set up ZEISS Optical Inserts for Apple Vision Pro | Apple Support

To set up ZEISS Optical Inserts with your Apple Vision Pro, first place a cover on the device to protect the glass and gather your optical inserts along with the pairing code from the card in the box. If the card is missing, generate a recovery code at myzeissvision.zeiss.com. Place the Apple Vision Pro on a stable surface and optionally remove the Light Seal and Solo Knit Band for easier setup. Attach the left and right optical inserts by aligning and snapping them into place magnetically. After removing the cover and connecting the battery, wear the device, adjust the fit, and follow the prompts to pair the inserts by pressing and holding the Digital Crown until you see a green check mark. If the pairing prompt doesn’t appear, press the top button four times and use the Digital Crown to select.

Summary:
– Place the cover on the Apple Vision Pro and gather the optical inserts and pairing code.
– Optionally remove the Light Seal and Solo Knit Band for easier setup.
– Attach the left and right optical inserts by aligning and snapping them into place.
– Remove the cover, connect the battery, and adjust the fit while wearing the device.
– Follow on-screen prompts to pair the inserts by pressing and holding the Digital Crown until a green check mark appears.

How to use background sounds on your Mac | Apple Support

In macOS Ventura, you can play ambient background sounds on your Mac. Start by clicking the Apple menu, then go to System Settings, followed by Accessibility, and select Audio. Turn on background sounds, and the sound will play immediately. You can choose different sounds, like Ocean or Rain, and the first time you select one, a high-quality version will download. Adjust the sound volume using the slider, and you can set it to stop automatically when your Mac enters screen saver mode. This feature is great for enhancing focus or relaxation.

Summary:
– In macOS Ventura, play ambient sounds through System Settings.
– Access this via Apple menu > System Settings > Accessibility > Audio.
– Turn on background sounds, with options like Rain or Ocean.
– Adjust the volume using a slider and change sounds as needed.
– Sounds can stop automatically when the screen locks or enters screen saver mode.

How to switch faces on Apple Watch | Apple Support

Starting in watchOS 10.2, you can easily swipe between Apple Watch faces. To enable this feature, press the Digital Crown to access your apps, then go to Settings and tap on Clock. From there, turn on “Swipe to Switch Watch Face.” Once activated, press the Digital Crown to return to your watch face, and you can now switch between the faces you’ve set up by swiping left or right from the edge of the screen. This allows you to change faces quickly with just a swipe.

Summary:
– In watchOS 10.2, you can swipe between Apple Watch faces.
– Access your apps by pressing the Digital Crown.
– In Settings, go to Clock and turn on “Swipe to Switch Watch Face.”
– Return to your watch face, and swipe left or right to switch between faces.
– Easily change watch faces with a swipe from the screen’s edge.

How to use Find My on Apple Watch | Apple Support

With the Find My app on your Apple Watch, you can locate lost devices, items, and share your location with friends and family. Once you’re signed into your Apple ID, Find My is automatically set up. Use the Find Devices app to locate missing Apple devices, such as iPhones or iPads, and the Find Items app for AirTagged belongings. If nearby, you can play a sound, or use the map to track its location. You can also turn on Lost Mode to lock the device and display a contact message. Additionally, the Find People app lets you easily share your location with others.

Summary:
– Use Find My on Apple Watch to locate lost devices or items with AirTags.
– Automatically set up when signed into your Apple ID.
– Play a sound, view on a map, or enable Lost Mode to lock missing devices.
– Use the Find People app to share your location with friends and family.
– Stay connected and track important items directly from your wrist.

How to use Apple Pay in stores | Apple Support

To use Apple Pay in stores, look for the contactless symbol or Apple Pay logo. Double-click the side button on an iPhone with Face ID or the Home button on an iPhone with Touch ID, then authenticate with Face ID, Touch ID, or a passcode. Your default card will appear, or you can select another card. Hold the top of your iPhone near the contactless reader, and once the transaction is complete, you’ll hear a chime and see a confirmation with a check mark on your screen. This allows you to make secure, quick purchases with Apple Pay.

Summary:
– Look for the contactless symbol or Apple Pay logo to use Apple Pay.
– Double-click the side button or Home button, then authenticate with Face ID, Touch ID, or a passcode.
– Your default card appears, but you can switch cards if needed.
– Hold your iPhone near the contactless reader to pay.
– A chime and confirmation message will appear once the transaction is complete.

How to add faces for Apple Watch on iPhone | Apple Support

To customize your Apple Watch face using your iPhone, open the Watch app and tap Face Gallery. Select a watch face from the gallery, then personalize it by adjusting options like color, style, and complications. To modify a complication, scroll down, tap on the one you want to change, and choose a new one from the list. Once you’ve made your adjustments, tap Add to save the customized face to My Faces. Keep in mind that some watch faces may not be available on all Apple Watch models or in all regions.

Summary:
– Open the Watch app on your iPhone and tap Face Gallery.
– Choose a watch face and customize options like color, style, and complications.
– To change a complication, scroll, tap it, and select a new one from the list.
– Tap Add to save the customized face to My Faces.
– Note that some watch faces may not be available on all models or in all regions.

How to recover and restore your Apple Watch | Apple Support

If your Apple Watch shows an iPhone and Apple Watch icon or a red exclamation point, you may need to recover it. First, ensure your watch is charged to at least 50% and remains on its charger throughout the process. Also, confirm your iPhone is updated to iOS 15.4 or later, and both devices are connected to Wi-Fi and Bluetooth.

If a recovery screen appears, or if you see a red exclamation point, double-click the side button to bring it up. Place your iPhone and Apple Watch close together, tap Continue on your iPhone, and enter the code displayed on the watch. The recovery process will start, updating your watch to the latest version of watchOS. Your watch will restart once recovery is complete, displaying your selected watch face and complications. For further assistance, contact Apple Support.

Summary:
– Ensure your Apple Watch is charged to at least 50% and keep it on the charger.
– Verify your iPhone is updated to iOS 15.4 or later, and both devices are connected to Wi-Fi and Bluetooth.
– If a recovery screen appears or you see a red exclamation point, double-click the side button on your watch.
– Bring your iPhone close to your Apple Watch, tap Continue on your iPhone, and enter the code shown on the watch.
– The recovery process will update your watch to the latest watchOS version and restart it, displaying your watch face and complications.

How to update your Apple Watch | Apple Support

To update your Apple Watch, first ensure your iPhone is running the latest iOS and that both devices are connected to Wi-Fi. Make sure your watch is charged to at least 50% and remains on its charger throughout the process. To update directly on the watch, go to the Home Screen, open Settings, tap General, and then Software Update. Tap Install or Download and Install if needed, and follow the onscreen instructions. For updating via your iPhone, open the Apple Watch app, go to the My Watch tab, tap General, and then Software Update. Agree to terms if prompted, tap Install or Download and Install, and enter your passcode if needed. Keep both devices near each other and on their chargers until the update is complete.

Summary:
– Ensure your iPhone is updated to the latest iOS, and both devices are connected to Wi-Fi.
– Charge your Apple Watch to at least 50% and keep it on the charger during the update.
– To update directly on the watch, go to Settings > General > Software Update, then tap Install or Download and Install.
– To update using your iPhone, open the Apple Watch app, go to My Watch > General > Software Update, then tap Install or Download and Install.
– Keep both devices near each other and on their chargers until the update finishes.

How to free up space on your Mac on macOS Catalina or earlier — Apple Support

To free up space on your Mac, start by making a Time Machine backup to avoid losing any important files. Check your storage usage by going to the Apple menu, selecting “About This Mac,” and clicking the Storage tab. Click “Manage” to see recommendations such as storing files in iCloud, optimizing storage by removing watched TV shows and movies, enabling automatic trash emptying, and reducing clutter by identifying large files and unused apps. For manual space management, sort applications and files by size or last accessed date in the Manage Storage section, delete unnecessary items, or move large files to an external drive.

Summary:
– Backup your files using Time Machine before starting.
– Check storage usage by going to Apple menu > About This Mac > Storage tab.
– Use “Manage” for recommendations like storing files in iCloud, optimizing storage, and emptying Trash automatically.
– Manually delete large files and unused apps from the Manage Storage section or Finder.
– Consider moving large files to an external drive for additional space.