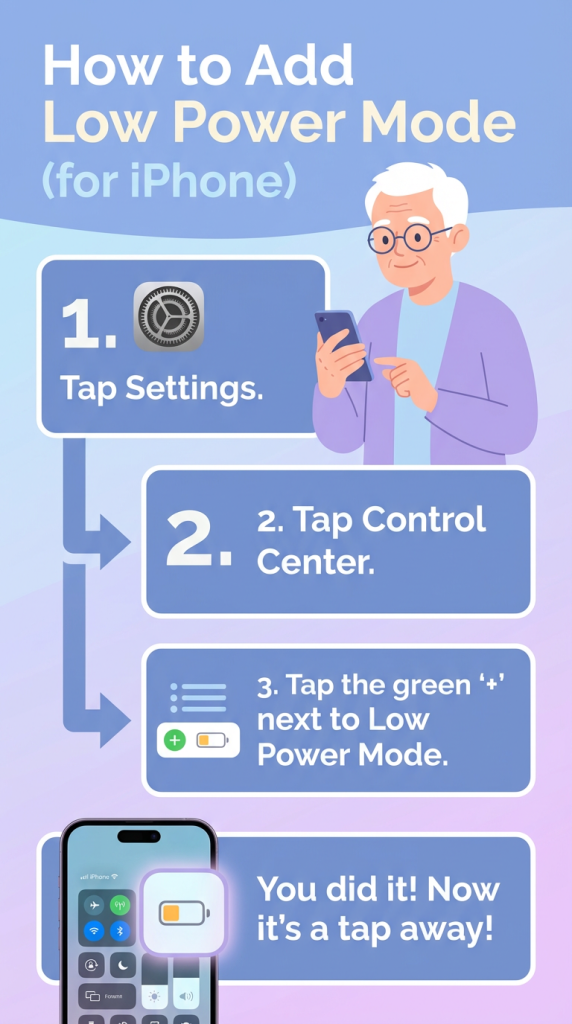
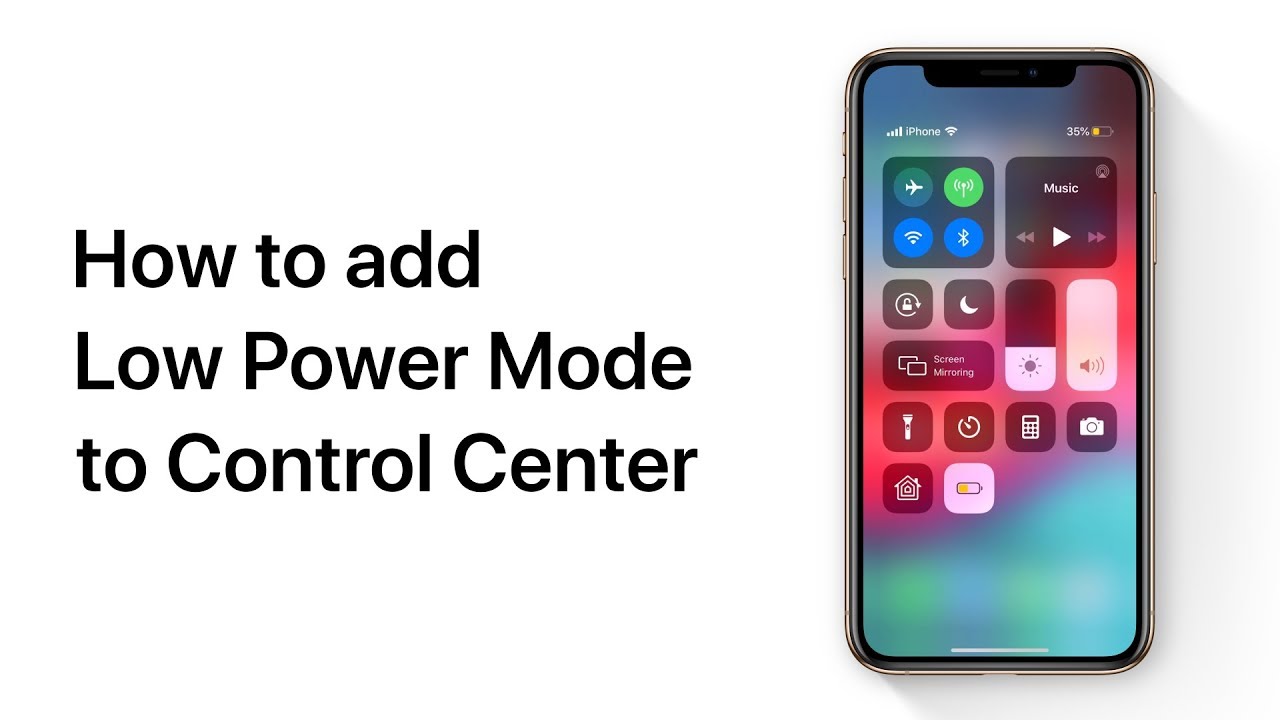
How to reinstall macOS from macOS Recovery — Apple Support

To reinstall macOS using macOS Recovery, first ensure your Mac is connected to the internet, plugged in, and turned off. If using a wireless keyboard, connect it via USB or use a wired or built-in keyboard. Start up your Mac and immediately press and hold one of these key combinations: Command-R to reinstall the latest macOS, Option-Command-R to upgrade to the latest compatible version, or Shift-Option-Command-R to reinstall the original macOS or a close version. Release the keys when you see the Apple logo or a startup screen. Enter your password if prompted, then choose “Reinstall macOS” from the Utilities window and follow the on-screen instructions. Select the disk for installation, and wait for the process to complete without interrupting. Once done, enter your password at the login window to finish the setup.

Summary:
– Ensure your Mac is connected to the internet, plugged in, and turned off before starting.
– Use the appropriate key combination at startup: Command-R (latest version), Option-Command-R (latest compatible version), or Shift-Option-Command-R (original or closest version).
– Release the keys when you see the Apple logo, enter your firmware or admin password if prompted, and select “Reinstall macOS” in the Utilities window.
– Follow the on-screen instructions to choose the installation disk and complete the process, which may involve multiple restarts and progress bars.
– Once installation is complete, log in with your password and follow any additional prompts.

How to import bookmarks, history, and passwords to Safari from Chrome on your Mac — Apple Support

To import your bookmarks, history, and passwords from Chrome to Safari, start by opening Safari and clicking “File” in the menu bar. Then, choose “Import From” and select “Chrome.” Ensure that Chrome is installed on your Mac to complete the process. Next, select the items you wish to import and click “Import.” Once the import is complete, click “OK” to finish. This process helps you quickly set up Safari with your existing data from Chrome.

Summary:
– Open Safari and click “File” in the menu bar.
– Choose “Import From” and select “Chrome.”
– Ensure Chrome is installed on your Mac for the import to work.
– Select the items (bookmarks, history, passwords) you want to import and click “Import.”
– Click “OK” once the import is complete to finish the process.

How to use Memoji on your Mac

In macOS Big Sur, you can easily customize your Memoji and use stickers in Messages. Start by opening Messages and clicking the app drawer, then select the Memoji stickers button and choose “More…” followed by “Edit” to enter the editing mode. Here, you can adjust your Memoji to your liking. Once you’re satisfied with the changes, click “Done.” To send Memoji stickers, simply click and drag a sticker onto a message, and it will be sent. This feature allows for personalized and expressive communication in your messages.

Summary:
– Open Messages and click the app drawer.
– Select the Memoji stickers button and click “More…”, then “Edit” to customize your Memoji.
– Make your desired changes and click “Done” to save.
– To send Memoji stickers, drag a sticker onto a message.
– Enjoy using personalized Memoji stickers in your messages.

How to customize your Safari start page on your Mac — Apple Support

In macOS Big Sur, you can customize your Safari start page by setting a custom background. First, open Safari and click the Customization button. Browse through the available images and choose one for your background. If you prefer to use your own photo, simply drag a picture from the Photos app to Safari. This will set your chosen image as the new background, allowing you to personalize your browser’s appearance.

Summary:
– Open Safari and click the Customization button.
– Choose a background image from the available options.
– To use your own photo, drag it from the Photos app to Safari.
– The selected image will set as your Safari start page background.
– This customization allows for a personalized browser experience.

How to set up Speak Selection on Mac | Apple Support

To have your Mac speak selected text using a keyboard shortcut, start by opening System Preferences and clicking on Accessibility. Next, select Spoken Content from the list. In this menu, check the box labeled “Speak Selection” to enable the feature. Once activated, you can select text anywhere on your Mac and use a keyboard shortcut to have it read aloud. This feature makes it easy to listen to text without needing to manually read it.

Summary:
– Open System Preferences and select Accessibility.
– Click on Spoken Content.
– Check the “Speak Selection” box.
– Use the keyboard shortcut to have selected text read aloud.
– The feature allows text to be spoken from anywhere on your Mac.

How to present with Keynote on a video conference on your Mac | Apple Support

To present using Keynote while video conferencing on your Mac, start by opening Keynote and selecting “Play” from the menu bar, then choose “Play Slideshow in Window.” In your video conferencing app, select Keynote from the share menu; the steps might differ slightly based on the app you’re using. Your presenter controls will appear in a separate window where you can show or hide slide thumbnails by clicking the Thumbnail button. Navigate through your slides using the arrow keys on your keyboard. This setup ensures a smooth presentation while managing your video conference.

Summary:
– In Keynote, select “Play” and then “Play Slideshow in Window” to start presenting.
– In your video conferencing app, share Keynote from the share menu.
– Presenter controls will be in a separate window.
– Use the Thumbnail button to show or hide slide thumbnails.
– Navigate slides using the arrow keys on your keyboard.

How to use Shortcuts on Mac | Apple Support

Starting in macOS Monterey, you can save time by automating tasks with the Shortcuts app. When you open the app, you may see shortcuts synced from your other Apple devices via iCloud, and personalized shortcuts from Siri. You can explore the Gallery for premade shortcuts organized by categories like accessibility and Siri. To create a custom shortcut, such as setting up two apps in split screen, select and customize the shortcut, then add it. You can run shortcuts from various locations like Spotlight or the menu bar by dragging them to the desired spot. It’s a simple, one-click process to streamline your tasks.

Summary:
– Automate tasks with the Shortcuts app in macOS Monterey.
– Sync shortcuts across Apple devices using iCloud.
– Explore premade shortcuts in the Gallery, organized by categories.
– Customize and create shortcuts, such as setting up two apps in split screen.
– Run shortcuts from the menu bar, Spotlight, or Siri for quick access.

How to use Mail on your Mac | Apple Support

To start using the Mail app on your Mac, open it and add your email account by entering your email address and password. You can choose to sync additional data like contacts and calendars. Once your emails download, you can send a new message by clicking the New Message button, entering the recipient’s address, adding a subject, and writing your message. You can also attach files and respond to emails using the Reply button. To organize your inbox, move messages between mailboxes or delete them as needed. Use the search function to find specific emails quickly.

Summary:
Add your email account in the Mail app on your Mac by entering your email address and password.
– Send new emails by clicking “New Message,” entering the recipient, subject, and message.
– Attach files to emails and respond to messages using the “Reply” button.
– Organize your inbox by moving messages between mailboxes or deleting them.
– Use the search function to quickly find specific emails.

How to move a Final Cut Pro library to an external drive on your Mac | Apple Support

To save space on your internal hard drive when using Final Cut Pro, you can move your library to an external drive. Start by connecting and formatting your external drive with APFS, and remove generated files from the library for a quicker move. In Final Cut Pro, select the library, consolidate your media files, and then reveal the library in Finder. Quit Final Cut Pro, drag the library file to the external drive, and reopen it from there. Finally, select the library in Final Cut Pro, consolidate the media, and continue working while it consolidates in the background.

Summary:
– Connect and format your external drive with APFS.
– In Final Cut Pro, select the library and consolidate media files.
– Reveal the library in Finder and quit Final Cut Pro.
– Drag the library file to the external drive and reopen it.
– Consolidate the media in Final Cut Pro while continuing to work.

How to update macOS on your Mac | Apple Support

To update macOS and get the latest features and security enhancements, start by ensuring your Mac is plugged into power, connected to the internet, and backed up using Time Machine. For macOS Ventura, go to the Apple menu, select System Settings, then Software Update. Enable automatic updates if desired, or click Update Now and follow the prompts. For macOS Monterey or earlier, go to System Preferences and Software Update, then either select updates manually or choose automatic updates. During installation, your Mac may restart or dim; just wait for the process to complete, then log back in and continue using your Mac.

Summary:
– Ensure your Mac is plugged in, connected to the internet, and backed up.
– For macOS Ventura, go to System Settings > Software Update and enable or start updates.
– For macOS Monterey or earlier, go to System Preferences > Software Update.
Select updates manually or enable automatic updates.
– Let the installation complete, then log back in to use your Mac.