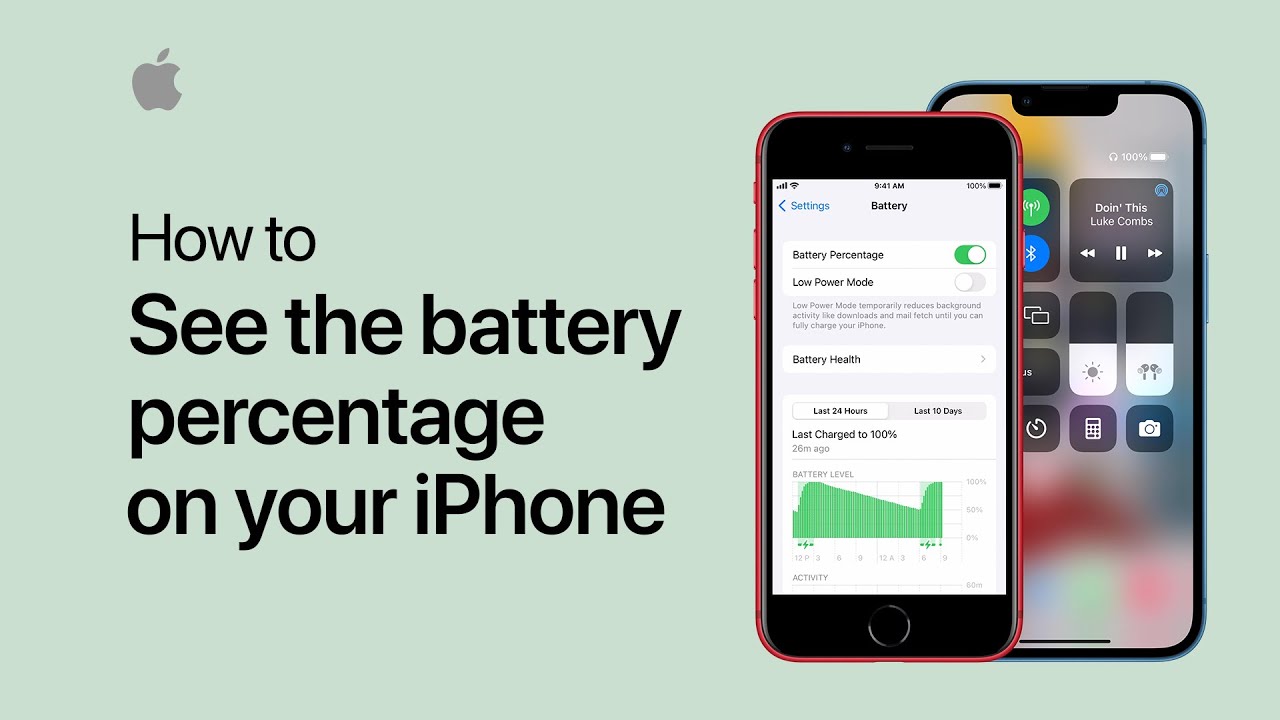
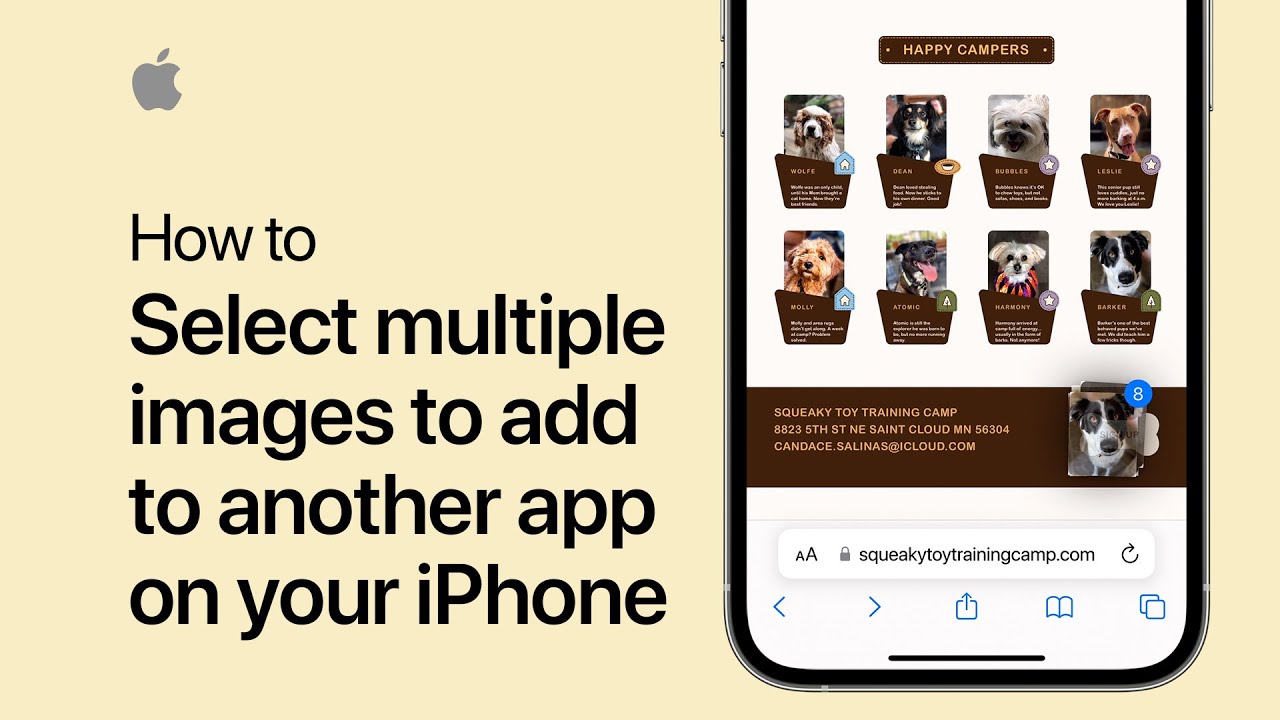
How to set up and use Apple Cash on your iPhone | Apple Support

practhumb103

Alright, let’s dive into setting up Apple Cash. First, ensure you have a compatible iPhone with the latest iOS version and two-factor authentication enabled for your Apple ID. Make sure all devices you want to use for sending and receiving money are signed in to iCloud with the same Apple ID. If you plan to add funds, have an eligible debit card in Wallet.

To set up Apple Cash, open Wallet or go to Settings > Wallet & Apple Pay, then turn on Apple Cash. Enter your Apple ID password, sign in, and authenticate with Face ID, Touch ID, or passcode. Review and accept terms and conditions, then tap continue and add a card if needed. Now you’re ready to send or request money via Messages.

In a conversation, tap the plus button, select Apple Cash, enter the amount, add a comment if needed, and send. To add funds, tap your Apple Cash card in Wallet, tap the more button, select add money, enter the amount, and authenticate. That’s it! You’re all set up to use Apple Cash for payments and more.

For further assistance, subscribe to the Apple Support YouTube channel or explore more tutorials. Remember, Apple Cash services are provided by Greenbank and available in the US only. Terms and conditions apply.

Summary:
– Ensure iPhone compatibility and two-factor authentication for Apple ID.
– Open Wallet or Settings to enable Apple Cash, authenticate, and accept terms.
– Add a debit card if necessary for funds.
– Use Messages to send or request money, specifying amount and adding a comment if desired.
– To add funds, access Wallet, tap Apple Cash, select “more,” choose “add money,” enter amount, and authenticate.

The First 14 Things I Do on a New iPhone

practhumb102

Hey there, if you’re diving into the world of Apple devices for the first time or making the switch from Android, or even if you’ve been an iOS user for ages, here’s what I usually do when setting up a new iPhone. First things first, once you’ve logged in and set up your Apple ID, think about backing up your device.

While you can use your computer for this, iCloud backup is the way to go for convenience. Then, if you’re transferring data from an old iPhone, you have a few options: direct transfer, iCloud backup, or starting fresh. Each has its pros and cons, so choose what works best for you. Oh, and don’t forget to put your new phone in a protective case!

As you explore settings, remember to customize control center for quick access to essential features. And while you’re at it, fine-tune notifications, privacy settings, and keyboard preferences to suit your needs. A few extra tips: use AirDrop for seamless file sharing, consider text replacement for efficiency, and explore accessibility features for added convenience. Finally, check out my playlist of tips and tricks for more in-depth guidance on getting the most out of your iPhone setup. Happy exploring!

Summary:
– Set up Apple ID and iCloud backup immediately after logging in.
– Choose between direct transfer, iCloud backup, or starting fresh when transferring data from an old iPhone.
Customize control center for quick access to essential features.
– Fine-tune notifications, privacy settings, and keyboard preferences to suit your needs.
– Explore additional features like AirDrop, text replacement, and accessibility settings for added convenience.

3 iPhone Super Useful Hidden Features!

practhumb101

Alright, let’s dive into three awesome iPhone productivity features you might have missed. Firstly, forget selecting items one by one; use a two-finger drag to select multiple items in Notes, Files, Messages, and more. Next, in Notes, utilize the camera icon to instantly scan text and translate it into typed characters, perfect for quick info extraction.

But the star of the show is Back Tap, found in Settings > Accessibility > Touch. This feature lets you map actions like launching the flashlight with a double tap or the camera with a triple tap on the back of your iPhone, filling the gap left by the lack of a power button shortcut. Enjoy the newfound efficiency!

Summary:

-Use two-finger drag to select multiple items in Apple apps like Notes and Files.
-Scan text instantly in Notes by using the camera icon, converting it into typed characters.
-Discover Back Tap in Settings > Accessibility > Touch to assign actions like launching the flashlight or camera with double or triple taps on the iPhone’s back.
-Enhance productivity by efficiently selecting, scanning, and accessing features with these hidden iPhone functionalities.
-Enjoy newfound convenience and efficiency with these lesser-known iPhone productivity features.

How To Use iPhone 14 Pro/iPhone 14 Pro Max! (Complete Beginners Guide)

practhumb100

If you just got your hands on the iPhone 14 Pro, congratulations! It’s quite different from the iPhone 14, with notable features like the dynamic island display. Let’s dive into how to use it effectively.

First off, the exterior boasts a stunning 6.1-inch super retina XDR OLED panel, now featuring a dynamic island display instead of a notch. On the left side, you’ll find the mute switch and volume buttons, while the SIM card tray has been replaced with eSIM capability.

Moving to the back, there’s a frosted glass finish, housing a wide, ultra-wide, telephoto lens, and a LiDAR sensor for augmented reality experiences. Noteworthy features include MagSafe capability, IP certification for water resistance, and an emergency SOS satellite mode.

Powering on your phone for the first time, you can explore iOS 16’s interface, with customizable lock screens and home screens. Gestures play a significant role in navigation, allowing you to swipe between apps and access multitasking by swiping up from the bottom.

Customizing your home screen is simple, with the ability to add widgets and rearrange app icons. The Control Center offers quick access to essential settings, which you can customize further in the Settings app.

Utilizing the dynamic island display, you can interact with certain apps for additional information by tapping on the display. And for any queries or assistance, Spotlight search and Siri are at your service.

Overall, the iPhone 14 Pro promises a lasting and enjoyable experience, with plenty of features to explore and personalize to your liking. If you have any questions or thoughts, feel free to leave them in the comments section, and don’t forget to like, subscribe, and stay tuned for more content!

Summary:

– iPhone 14 Pro features a 6.1-inch super retina XDR OLED panel with a dynamic island display replacing the notch.
– Notable design elements include a frosted glass back and a camera setup consisting of wide, ultra-wide, telephoto lenses, and a LiDAR sensor.
– Key functionalities include MagSafe capability, IP certification for water resistance, and an emergency SOS satellite mode.
– iOS 16 offers customizable lock screens, home screens, and gestures for navigation, with the Control Center providing quick access to settings.
– Utilizing the dynamic island display, users can interact with certain apps for additional information by tapping on the display, with Spotlight search and Siri available for assistance.

The iPhone Shortcuts App Explained – iOS Siri Shortcuts for Beginners

practhumb99.2

Shortcuts is super powerful yet often misunderstood. Essentially, it lets you automate tasks on your iPhone. Think of it like setting up macros in Excel, where you pre-program a sequence of actions.

With Shortcuts, you can do things like opening apps, sending messages, or even getting driving directions, all with a single tap or voice command. And the best part? You don’t need to be a coding expert to create your own shortcuts. You can start by exploring pre-made shortcuts in the app’s gallery or downloading them from the web. But if you’re feeling adventurous, you can also create your own from scratch. It’s a game-changer for streamlining your phone experience. So, stick around as I walk you through the basics and share some simple shortcuts to get you started.

Summary:

– Shortcuts app for iPhone is powerful yet often misunderstood.
– It automates tasks on your iPhone, like macros in Excel.
– You can create shortcuts for opening apps, sending messages, and more.
– You don’t need coding expertise to create shortcuts.
– You can explore pre-made shortcuts or create your own from scratch.

How To Use Your iPhone 13 / iPhone 13 Mini! (Complete Beginners Guide)

practhumb98.2

Hey everyone, welcome back! Today, I’m going to give you a quick tutorial on how to use your new iPhone 13 or iPhone 13 Mini. Firstly, let’s familiarize ourselves with the exterior features. You’ve got your 6.1-inch or 5.4-inch display, volume buttons, ringer switch, and charging port at the bottom. To calibrate your battery, drain it completely, then charge it to 100%.

Check for updates and download the Apple Support app to monitor battery health. Now, onto navigating the phone. Tap the screen to wake it, swipe to access the camera, and swipe down for the Control Center. In settings, you can customize various options and check for software updates. Don’t forget about handy features like screenshotting and screen recording. For a deeper dive into the iPhone 13 Pro, check out the separate tutorial linked in the description. Remember to like, subscribe, and hit the bell for more content. Thanks for watching, and see you in the next one!

Summary:

– **Exterior Features**: iPhone 13 or 13 Mini has a 6.1-inch or 5.4-inch display, volume buttons, ringer switch, and charging port.
– **Battery Calibration**: Drain the battery, then charge it to 100% for calibration.
– **Software Updates**: Check for updates and download the Apple Support app to monitor battery health.
– **Navigation Tips**: Tap to wake, swipe for camera, and access Control Center by swiping down.
– **Handy Features**: Use screenshot and screen recording functions for convenience.

How To Calibrate an iPhone Battery (Step By Step)

practhumb97.2

Hey everyone, the iPhone 15 Pro is finally here, and it’s a fantastic device! Let’s dive into how to make the most of it. First things first, protect your investment with a screen protector or case. Now, onto the device itself. It boasts a stunning 6.1-inch super retina XDR OLED display with a dynamic island at the top, housing the front camera. Made of titanium, it’s sturdy but may show some discoloration over time. The new action button replaces the mute switch and can be customized for various functions. The USB-C port at the bottom allows for versatile charging and accessory connectivity. On the software side, iOS 17 brings enhancements to the lock screen, home screen, and control center. Familiarize yourself with gestures, multitasking, and accessing settings for a seamless experience. Don’t forget regular software updates and explore the settings for customization options. With these basics covered, you’re ready to make the most of your iPhone 15 Pro! If you have any questions, drop them in the comments below. Don’t forget to subscribe for more tips and tricks. Thanks for watching!

Summary:

– iPhone 15 Pro overview: highlights the device’s features and build quality, emphasizing durability and new functionalities like the action button and USB-C port.
– Protection first: Recommends applying a screen protector or case to safeguard the device.
– iOS 17 enhancements: Describes improvements to the lock screen, home screen, and control center for a better user experience.
– Software navigation: Explains gestures, multitasking, and accessing settings for customization.
– Importance of updates: Emphasizes the need to keep the device up-to-date with regular software updates for optimal performance and security.

Turn Off These iPhone SYSTEM SERVICES Now! [Ultimate Guide]

practhumb96.2

In this comprehensive guide, we explore various iPhone system services, shedding light on their functionalities and implications. Starting with location services, we navigate through settings like alerts and shortcuts automations, Apple Pay merchant identification, and cell network search, discussing their impact on privacy and battery life. We delve into features like compass calibration and emergency SOS, emphasizing their significance and potential trade-offs. Further, we tackle settings such as significant locations, iPhone analytics, and routing and traffic, weighing their benefits against battery drain concerns. Throughout, we offer insights and recommendations for optimizing settings to enhance user experience and privacy.

Summary:
– The guide explores iPhone system services comprehensively, covering functionalities and implications.
– It discusses settings such as location services, alerts, and shortcuts automations, and Apple Pay merchant identification.
– Features like compass calibration and emergency SOS are highlighted for their significance and potential trade-offs.
– Recommendations are provided for optimizing settings to enhance user experience and privacy.
– Insights are offered on various settings’ impact on battery life and privacy concerns.

iOS 17: How to Change Ringtone on iPhone

practhumb95.2

Hey everyone, welcome to our tutorial on changing the ringtone on an iPhone in iOS 17. If you’re tired of the default ringtone, here’s how to switch it up. First, open the Settings app and select “Sounds and Haptics.” From there, find the “Ringtone” option. You can scroll through the default tones or head to the iTunes store for more options. Once you’ve found the tone you like, select it, and it’ll play a sample. Confirm your choice, and that’s it! Next time someone calls, you’ll hear your new ringtone.

Summary:
– Tutorial on changing iPhone ringtone in iOS 17.
– Open Settings, select “Sounds and Haptics.”
– Find “Ringtone” option, scroll through defaults or visit iTunes store.
– Select desired tone, listen to sample, confirm choice.
– New ringtone will play for incoming calls.

How to Set Up and Activate iPhone 13/iPhone 13 Pro/iPhone 13 Mini

practhumb94.2

Today, we’re diving into setting up the iPhone 13 Pro in the stunning Starlight color. Let’s begin by turning it on, holding the side button until the Apple logo appears. Then, select your language and country. If you’re transferring data from your old iPhone, use Quick Start by placing both devices nearby, turning the screen off and on, and following the prompts. Otherwise, set up manually, connect to Wi-Fi or insert a SIM card for cellular data. Activate Face ID, create a passcode, and customize settings like Siri and Screen Time. Finally, enter your Apple ID, set up payment methods, and voila, your data transfer begins! Enjoy your new iPhone 13 Pro!

Summary:

– Tutorial on setting up iPhone 13 Pro and transferring data from an old device.
– Turn on iPhone 13, select language, and choose setup options manually or use Quick Start for data transfer.
– Activate the device with Wi-Fi or cellular data, set up Face ID, passcode, and customize settings.
– If transferring data, initiate Quick Start by placing the old device near the new one and follow prompts.
– Complete setup, including Apple ID login and customization, then enjoy the new iPhone with transferred data and settings.