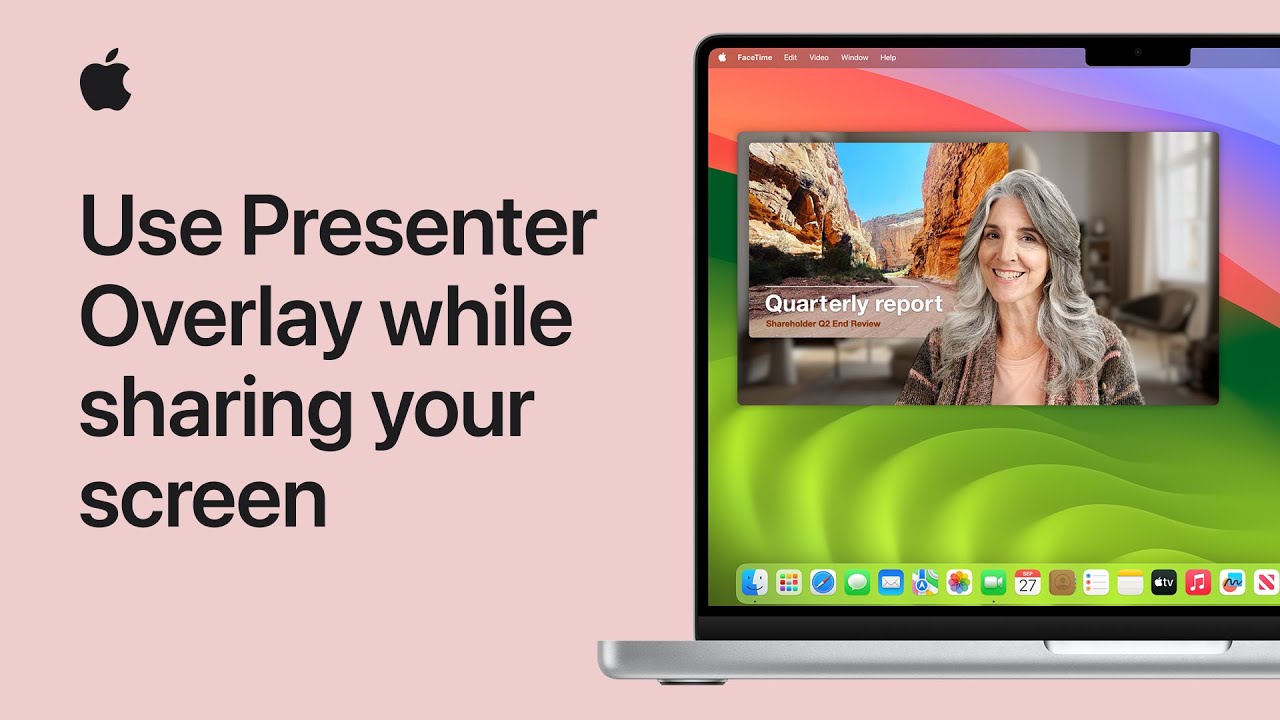
How to use live video in Keynote on Mac | Apple Support

To add live video to your Keynote presentation on your Mac, start by clicking “Media” in the toolbar and selecting “Live Video” from the menu. Adjust the video by clicking “Live Video” in the Format sidebar, where you can change the source camera, add a mask, or customize the background with options like no fill, a color gradient, or an image. For this example, we’ll add a mask. Drag the video to position it or resize it by dragging the handles. Click “Play” to view your presentation, and your camera will activate, showing live video of you during the presentation.

Summary:
– In Keynote on Mac, add live video by clicking “Media” and selecting “Live Video.”
– Adjust video settings in the Format sidebar, including changing the camera source, adding a mask, or customizing the background.
– Choose from options like no fill, a color gradient, or an image for the background.
– Position and resize the video by dragging it and adjusting the handles.
– Click “Play” to start the presentation; your camera will show live video during the selected slide.

How to set up alerts in Calendar on Mac | Apple Support

To enhance your calendar experience on Mac with alerts, first ensure that calendar notifications are enabled in System Settings. Open the Calendar app, double-click an event to view its details, click the event’s time, and access the alert options. You can select a notification based on time or location; if the event has an address and location services are enabled, you’ll see a “Time to Leave” option. To set up additional alerts, hover over the alert menu, click the add button, and choose a new alert type such as “Message with Sound” or “Email.” Customize the alert timing, and click OK to finalize your settings.

Summary:
– Ensure calendar notifications are enabled in System Settings on your Mac.
– Double-click an event in the Calendar app and click the event’s time to set an alert.
– Choose the “Time to Leave” option if the event has an address and location services are enabled.
– Add a second alert by clicking the add button and selecting a custom alert type like “Message with Sound” or “Email.”
– Set the alert time and finalize by clicking OK to receive notifications as configured.

How to take a screenshot and record the screen on your Mac | Apple Support

To capture your Mac screen, start by taking a screenshot using keyboard shortcuts. Press Shift + Command + 3 to capture the entire screen, and a thumbnail will appear in the bottom right for immediate editing or sharing, or it will save to your desktop. For a portion of the screen, press Shift + Command + 4, drag to select the area, and release to capture; press Escape to cancel. To capture a specific window, use Shift + Command + 4, then press the Spacebar to change the cursor to a camera, click the window to capture it. For screen recording, press Shift + Command + 5 to open the screenshot toolbar, choose to record the entire screen or a selected portion, click Record, and stop with Command + Control + Escape. Your recording will appear as a thumbnail for immediate editing or saving.

Summary:
– To capture the entire screen on a Mac, press Shift + Command + 3; a thumbnail appears for immediate editing or saves to the desktop.
– For a portion of the screen, press Shift + Command + 4, then click and drag to select the area.
– To capture a specific window, press Shift + Command + 4, then Spacebar, and click the window.
– For screen recording, press Shift + Command + 5, choose to record the entire screen or a portion, and click Record.
– Stop recording with Command + Control + Escape; the recording appears as a thumbnail for immediate action or saves to the desktop.

5 helpful tips for using your iPhone and Mac together | Apple Support

To make the most of Continuity between your iPhone and Mac, first ensure both devices are updated to the latest software, signed in with the same Apple ID, and have Handoff, Bluetooth, and Wi-Fi enabled. Use Universal Clipboard to copy text or images on your iPhone and paste them on your Mac. To sync Focus settings across devices, turn it on via the Control Center. Share files using AirDrop by selecting and sending them to your Mac, where they will appear in the Downloads folder. For scanning, use your iPhone’s camera within a Mac app to add documents directly. Lastly, add your favorite iPhone widgets to your Mac desktop through the widget gallery for easy access.

Summary:
– Ensure both your iPhone and Mac are updated, signed in with the same Apple ID, and have Handoff, Bluetooth, and Wi-Fi enabled to use Continuity features.
– Use Universal Clipboard to copy text or images on your iPhone and paste them on your Mac.
– Sync Focus settings across devices by turning it on via the Control Center on your iPhone or Mac.
Use AirDrop to transfer files between your iPhone and Mac quickly, with items appearing in the Downloads folder on your Mac.
Scan documents using your iPhone’s camera directly within a compatible Mac app, and add iPhone widgets to your Mac desktop for easy access.

How to use your Apple Watch | Apple Support

To familiarize yourself with your Apple Watch and its useful gestures and features in watchOS, start by responding to notifications with a tap on your wrist. To respond immediately, raise your wrist and tap the app drawer to share your location or send an emoji. Access Notification Center by swiping down from the top of your watch face to view and manage notifications. Use Control Center to toggle Do Not Disturb or find your iPhone by pressing the side button. View your apps by pressing the Digital Crown, and access recent apps with a double-click. Customize watch faces by holding the watch face and using Siri for reminders. Emergency calls can be made by holding the side button and dragging the emergency call slider. Explore more features by subscribing to the Apple Support YouTube channel.

Summary:
– To respond to notifications, raise your wrist and use the app drawer to share your location or send an emoji; access Notification Center by swiping down from the top of your watch face.
– Open Control Center by pressing the side button to quickly toggle settings like Do Not Disturb or find your iPhone.
– Access apps by pressing the Digital Crown and view recent apps with a double-click.
– Customize watch faces by holding the current face and using the options to edit or change faces; use Siri for setting reminders.
– Make emergency calls by holding the side button and dragging the emergency call slider.

How to customize the Action button on Apple Watch Ultra | Apple Support

To customize the Action Button on your Apple Watch Ultra, open the Apple Watch app on your iPhone and tap on the “Action Button” option. From the action menu, you can select a new function for the button. Available choices include starting a workout, using the stopwatch, creating a Compass Waypoint, or using Backtrack to retrace your steps if you get lost. You can also start a dive session or turn on the flashlight. This customization allows you to tailor the Action Button to suit your needs, enhancing the functionality of your Apple Watch Ultra.

Summary:
Open the Apple Watch app on your iPhone to customize the Action Button on the Apple Watch Ultra.
– Tap “Action Button” and choose a new function from the action menu.
– Available actions include starting a workout, using the stopwatch, or creating a Compass Waypoint.
– You can also use Backtrack to retrace your steps, start a dive session, or turn on the flashlight.
– Customizing the Action Button enhances the functionality of your Apple Watch Ultra to better suit your needs.

How to use AssistiveTouch on Apple Watch | Apple Support

With Assistive Touch on Apple Watch, you can use hand gestures instead of the touchscreen to navigate and perform actions. To enable it, go to Accessibility settings on your Apple Watch or the Apple Watch app on your iPhone, then turn on Assistive Touch. Customize gestures like pinching your thumb and pointer finger to move forward, double pinching to go back, clenching your fist to select, and double clenching to open the action menu for tasks like scrolling. When Assistive Touch is active, a blue ring appears around the screen, allowing you to navigate notifications and perform quick actions with ease.

Summary:
– Enable Assistive Touch on your Apple Watch or through the Apple Watch app on your iPhone by accessing the Accessibility settings.
– Customize hand gestures: pinch to move forward, double pinch to go back, clench to select an item, and double clench to open the action menu.
– The action menu allows complex actions like scrolling or pressing the digital crown.
– A blue ring indicates that Assistive Touch is active, allowing gesture navigation and quick actions.
– Use gestures to navigate notifications and perform actions like answering calls or stopping timers with double pinches.

10 helpful Apple Watch tips you should know | Apple Support

To make the most of your Apple Watch, here are some key tips to get you started. In watchOS 10, access the flashlight by pressing the side button in Control Center, allowing you to choose between steady or flashing lights. Pin widgets to your Smart Stack by scrolling with the digital crown and holding your preferred widget. Locate your iPhone by tapping the Ping button in Control Center, or use the Camera Remote app to take photos with your iPhone. Enable Apple Watch mirroring via iPhone settings for on-screen navigation. Additionally, manage multiple timers in the Timer app, take screenshots, and use voice dictation for text replies.

Summary:
– Access the flashlight in watchOS 10 by pressing the side button in Control Center, with options for steady or flashing lights.
– Pin widgets to your Smart Stack by scrolling with the digital crown, holding the widget, and selecting the pin option.
Locate your iPhone by tapping the Ping button in Control Center, or use the Camera Remote app to take photos remotely with your iPhone.
– Enable Apple Watch mirroring via iPhone settings under Accessibility for on-screen navigation of your watch.
– Manage multiple timers in the Timer app, take screenshots, and use voice dictation for text replies directly from your Apple Watch.

How to Update Old iPad to iPadOS 15 | Install iOS 15 Unsupported iPad

To update your iPad to iPadOS 15, start by checking for updates in the Settings app under “Software Update.” If your iPad isn’t compatible with the latest updates, you’ll need to use the Apple Beta Software Program. Open your browser, search for “Apple Beta Software Program,” and sign in with your Apple ID or create a new one if needed. Once signed in, enroll your device and download the profile for iPadOS 15. Install the profile from Settings, then restart your iPad. After rebooting, go back to Settings and check for updates again. You should see iPadOS 15 available for installation.

Summary:
Check for Updates: Go to Settings > Software Update to see if iPadOS 15 is available for your device.
Apple Beta Program: If not available, visit the Apple Beta Software Program website and sign in or create an Apple ID.
Download Profile: Enroll your device and download the iPadOS 15 profile.
Install Profile: Install the downloaded profile from Settings, then restart your iPad.
Final Update: After reboot, check Settings > Software Update again to install iPadOS 15.

How to Download Apps on Old iPad (iPad Mini / iPad 1, 2, 3, 4 / iPad Air)

To download popular apps like YouTube on older iPads, start by signing into your iTunes account on your iPad through the Settings app. Go to the App Store, search for the app you want, and you might see a message indicating it’s not compatible. To bypass this, use a newer Apple device with the latest iOS and sign into the same iTunes account. Download the desired app on the newer device, then go to the Purchases section on the older iPad to find and download the last compatible version of the app. You can also ask someone with a newer device to help if needed.

Summary:
– Sign into your iTunes account on the older iPad through Settings.
– Search for the app you want in the App Store; if it’s not compatible, use a newer device.
– On the newer device, sign into the same iTunes account and download the app.
– On the older iPad, go to the Purchases section in the App Store to find and download the last compatible version.
– Alternatively, ask someone with a newer device to download the app for you and then use your account on the older iPad.