How to customize Control Center on iPhone, iPad, and iPod touch — Apple Support

practhumb11.2.1

Customize Control Center for easy access to frequently used features. In Settings, navigate to Control Center to add or remove controls. Use the “Add” or “Remove” buttons accordingly. Rearrange controls by touching and holding the gray lines, then moving them up or down. To access Control Center, swipe down from the top right corner of the screen or swipe up from the bottom edge on iPhones with a home button. Tap on desired controls to use them efficiently.

Summary:
– Customize Control Center in Settings to access frequently used features quickly.
– Add or remove controls using the respective buttons.
– Rearrange controls by touching and holding the gray lines.
– Access Control Center by swiping down from the top right corner or up from the bottom edge (on iPhones with a home button).
– Tap desired controls in Control Center to utilize them effectively.

How to Fix Blurry iPhone Photos: Quick and Easy Methods

Ever taken a great photo only to find out it’s blurry? Don’t worry—you don’t need expensive software or expert skills to fix it! This guide will show you how to sharpen blurry iPhone photos using simple built-in tools and free apps. Let’s get started!

Table of Contents

Why Do iPhone Photos Turn Out Blurry?

Before fixing a blurry photo, it helps to know why it happens:

  • Camera Shake – Moving while taking a picture can cause blurriness.
  • Low Light – Poor lighting makes it harder for the camera to focus.
  • Dirty Lens – A smudged lens can make photos appear out of focus.
  • Motion Blur – Fast-moving subjects can create blur in pictures.

Simple Fixes Using the iPhone Photos App

Your iPhone has built-in tools to help sharpen blurry pictures. Here’s how to use them:

  1. Open the Photos App – Find the blurry photo you want to fix.
  2. Tap Edit (Top Right Corner) – This opens the editing options.
  3. Select the Sharpness Tool – Tap the adjustment button (looks like a dial) and choose Sharpness.
  4. Increase Sharpness – Slide the bar to the right to enhance details.
  5. Use Definition and Contrast – Adjust these settings to make edges clearer.
  6. Tap Done – Save your improved photo.

Using Free Apps to Sharpen Blurry Photos

If the built-in tools don’t give you the results you want, try these free apps:

1. Snapseed (By Google)

  • How to Use:
    • Open Snapseed and load your photo.
    • Tap Tools and select Details.
    • Adjust Sharpening and Structure to enhance clarity.
    • Save your photo when you’re happy with the result.

2. Remini

  • Best For: Fixing very blurry images with AI enhancement.
  • How to Use:
    • Upload your blurry photo.
    • Let the app apply AI sharpening.
    • Save and share your improved image.

3. Adobe Lightroom Mobile

  • How to Use:
    • Import your photo into Lightroom.
    • Use the Sharpening tool under Detail.
    • Adjust clarity and contrast to make edges stand out.

Preventing Blurry Photos in the Future


Here are a few tips to take clearer photos from the start:

  • Hold Your iPhone Steady – Use both hands or a tripod.
  • Clean the Camera Lens – Wipe it with a soft cloth.
  • Use Burst Mode for Moving Subjects – This takes multiple shots to catch the clearest one.
  • Tap to Focus – Before taking a picture, tap the screen where you want to focus.

Final Thoughts

Blurry photos can be frustrating, but fixing them is easier than you think! Whether you use the built-in Photos app or a free third-party app, you can sharpen your images in just a few taps. Try these methods and get clear, crisp pictures every time!

Got a favorite photo-fixing app? Share your experience in the comments below!

How to transfer your data and set up your new iPhone | Apple Support

practhumb9.2

To transfer data to a new iPhone, three methods are outlined. If the previous iPhone is available, iCloud backup is recommended, ensuring apps and data download seamlessly. Another option is a direct transfer via Wi-Fi, although both devices are occupied during the process. If the old iPhone is absent, iCloud backup restoration is possible, requiring the latest backup and Apple ID. All methods entail following on-screen prompts, including setting up cellular service and an eSIM. Ultimately, each approach ensures a smooth transition to the new device, with apps and data continuously downloading in the background when connected to Wi-Fi.

Summary:
– Three methods for transferring data to a new iPhone are discussed.
– iCloud backup is recommended if the previous iPhone is available.
– Direct transfer via Wi-Fi is an option, but both devices are occupied during the process.
– iCloud backup restoration is possible even if the old iPhone is absent.
– Each method involves following on-screen prompts and ensures a smooth transition to the new device.

How to Lock Specific Apps on iPhone Without Third-Party Apps

Keeping certain apps locked on your iPhone can help maintain privacy, especially if you share your device with family or friends. The good news is that you don’t need to install any extra apps—Apple provides built-in tools like Screen Time and Shortcuts to help you lock apps easily.

Follow this step-by-step guide to secure your apps effortlessly.

Table of Contents

Method 1: Using Screen Time to Lock Apps

Screen Time is an iPhone feature that helps you manage app usage, but it can also be used to lock specific apps. Here’s how:

Step 1: Open Screen Time

  1. Open the Settings app on your iPhone.
  2. Scroll down and tap Screen Time.
  3. If you haven’t set it up, tap Turn On Screen Time and follow the prompts.

Step 2: Set a Screen Time Passcode

  1. Tap Use Screen Time Passcode.
  2. Set a four-digit passcode (make sure it’s different from your device unlock code).

Step 3: Lock Specific Apps

  1. Tap App Limits > Add Limit.
  2. Choose a category or tap All Apps & Categories to see all installed apps.
  3. Select the app(s) you want to lock and tap Next.
  4. Set the timer to 1 minute and tap Add.
  5. Once the time is up, the app will be locked. You’ll need to enter the Screen Time passcode to access it.

Method 2: Using Guided Access to Lock Apps Temporarily

Guided Access is useful when you want to restrict access to just one app at a time, preventing anyone from switching apps.

Step 1: Enable Guided Access

  1. Open Settings > Accessibility.
  2. Scroll down and tap Guided Access.
  3. Toggle it On, then tap Passcode Settings to set a passcode.

Step 2: Start Guided Access

  1. Open the app you want to lock.
  2. Triple-press the Side/Home button.
  3. Tap Start to activate Guided Access.
  4. To exit, triple-press the button again, enter your passcode, and tap End.

Method 3: Locking Apps with Shortcuts and Automation

The Shortcuts app lets you create an automation that locks apps when opened.

Step 1: Create an Automation

  1. Open the Shortcuts app.
  2. Tap Automation > Create Personal Automation.
  3. Scroll down and tap App.
  4. Tap Choose, select the app(s) you want to lock, and tap Done.

Step 2: Set Up a Lock Action

  1. Tap Next > Add Action.
  2. Search for Lock Screen and select it.
  3. Tap Next > Done to save the automation.

Now, whenever someone tries to open the selected app, the screen will automatically lock, requiring Face ID, Touch ID, or a passcode to unlock.

Final Thoughts

Locking apps on your iPhone without third-party apps is easy using Apple’s built-in features. Whether you use Screen Time, Guided Access, or Shortcuts, these methods help keep your apps private and secure. Try them out and choose the one that best fits your needs!

How to back up your iPhone to iCloud | Apple Support

practhumb8.2

Backing up your iPhone to iCloud is simple and essential for data security. In Settings, under iCloud, users can enable iCloud Backup and initiate the backup process with a single tap. Subscribing to the Apple Support YouTube channel provides additional guidance for utilizing iPhone features effectively.

Summary:
– iCloud backup for iPhones is crucial and easy.
– In Settings, navigate to iCloud and enable iCloud Backup.
– Users can initiate the backup process with a single tap.
– Subscribing to the Apple Support YouTube channel offers further guidance.
– Backing up ensures data security and ease of use.

How to use Dual SIM on your iPhone | Apple Support

practhumb6.2

Dual SIM functionality allows two cellular plans on one iPhone. Compatible with certain models, users must purchase or transfer a secondary plan. After activation, setup in settings includes labeling lines and choosing defaults for various services. Only two lines can be active simultaneously. Instructions include selecting default lines for calls, texts, iMessage, and FaceTime, and managing cellular data usage. Signal strength indicators differentiate between lines. Users can assign lines to contacts for default communication. Changing lines mid-call is also explained. Subscribe to Apple Support for further assistance.

Summary:
– Dual SIM enables two cellular plans on one iPhone.
– Compatible with specific iPhone models.
– Setup involves labeling lines and choosing defaults.
– Only two lines can be active simultaneously.
– Users can assign lines to contacts and change lines mid-call.

How to Recover a Hacked Apple ID & Protect Your iPhone

If you suspect that your Apple ID has been hacked, don’t panic. Follow these steps to regain control and secure your account.

Step 1: Check for Signs of a Hacked Apple ID

Look for these warning signs:

  • You receive an email about changes to your Apple ID that you didn’t make.
  • You can’t sign in to your Apple ID account.
  • You notice unfamiliar purchases or messages sent from your account.
  • Your device is locked or lost unexpectedly through Find My iPhone.

If any of these apply, proceed with recovery steps immediately.

Step 2: Reset Your Apple ID Password

  1. Open a web browser and go to iforgot.apple.com.
  2. Enter your Apple ID (usually your email address).
  3. Follow the on-screen instructions to reset your password.
  4. If prompted, answer your security questions or use another trusted device to verify your identity.
  5. Create a strong new password that you haven’t used before.

Step 3: Sign Out of All Devices

After resetting your password, sign out of all devices to prevent the hacker from accessing your account:

  1. Go to appleid.apple.com and sign in.
  2. Scroll down to the Devices section.
  3. Click on each device and select Remove from account if you don’t recognize it.
  4. Sign back into your trusted devices using your new password.

Step 4: Enable Two-Factor Authentication (2FA)

Two-factor authentication adds an extra layer of security.

  1. Open Settings on your iPhone.
  2. Tap [Your Name] > Password & Security.
  3. Tap Turn On Two-Factor Authentication and follow the prompts.
  4. Enter a trusted phone number where you’ll receive verification codes.
  5. When logging in, always enter the verification code sent to your trusted device.

Step 5: Secure Your Apple ID

  • Update Security Information: Make sure your recovery email and phone number are correct.
  • Avoid Phishing Scams: Never click suspicious links or share your Apple ID login details.
  • Check Account Activity: Regularly review your Apple ID activity at appleid.apple.com.
  • Keep Software Updated: Always update your iPhone and Apple devices to the latest software version.

What to Do If You Still Can’t Access Your Apple ID

If you’re unable to reset your password or regain access, contact Apple Support immediately:

  • Visit support.apple.com and select Apple ID Support.
  • Call Apple Support for assistance.
  • Provide any necessary details to verify your identity and recover your account.

Final Thoughts

Recovering a hacked Apple ID may seem overwhelming, but by following these steps, you can regain control of your account and protect your iPhone from future threats. Stay vigilant, enable security features, and always use a strong password.

How to activate an eSIM on your iPhone | Apple Support

practhumb5.2

You can activate an eSIM on your iPhone during setup or later via Settings. Ensure your carrier supports eSIM and update iOS. If provided an eSIM, it activates during setup; otherwise, transfer your number using eSIM Quick Transfer. Complete setup, converting physical SIM to eSIM if needed. Follow carrier prompts to activate eSIM, possibly scanning a QR code. In Settings, navigate to Cellular > Set Up Cellular, or Add eSIM for additional lines, to activate or scan a QR code. Once done, your eSIM is ready for use. Subscribe to Apple Support for more iPhone tips.

Summary:
– Activate eSIM during iPhone setup or later via Settings.
– Ensure carrier supports eSIM and update iOS.
– Transfer number using eSIM Quick Transfer if eSIM not provided.
– Complete setup, converting physical SIM to eSIM if needed.
– Follow carrier prompts or scan QR code in Settings to activate eSIM.

How to erase your iPhone | Apple Support

practhumb4.2

To reset your iPhone to factory settings, ensure you have an iCloud or computer backup. On your iPhone, go to Settings > General > Reset > Erase All Content and Settings, enter your passcode, and follow prompts to turn off Find My and confirm erasure. Alternatively, on a Mac (Catalina or later) or PC with iTunes, disable Find My, connect your iPhone, trust the computer, select your device, and click Restore iPhone. Confirm erasure, wait for iOS installation, and your iPhone will restart. Follow on-screen setup instructions. Subscribe to Apple Support for more tips.

Summary:
Ensure you have an iCloud or computer backup before resetting.
– On iPhone: Go to Settings > General > Reset > Erase All Content and Settings.
– Enter passcode, disable Find My, and confirm erasure.
– On Mac (Catalina or later) or PC with iTunes: Disable Find My, connect iPhone, and select Restore iPhone.
– Confirm erasure, wait for iOS installation, and follow setup instructions after restart.

How to Change Default Apps on Your iPhone (Browser, Mail, Maps, & More)

default apps

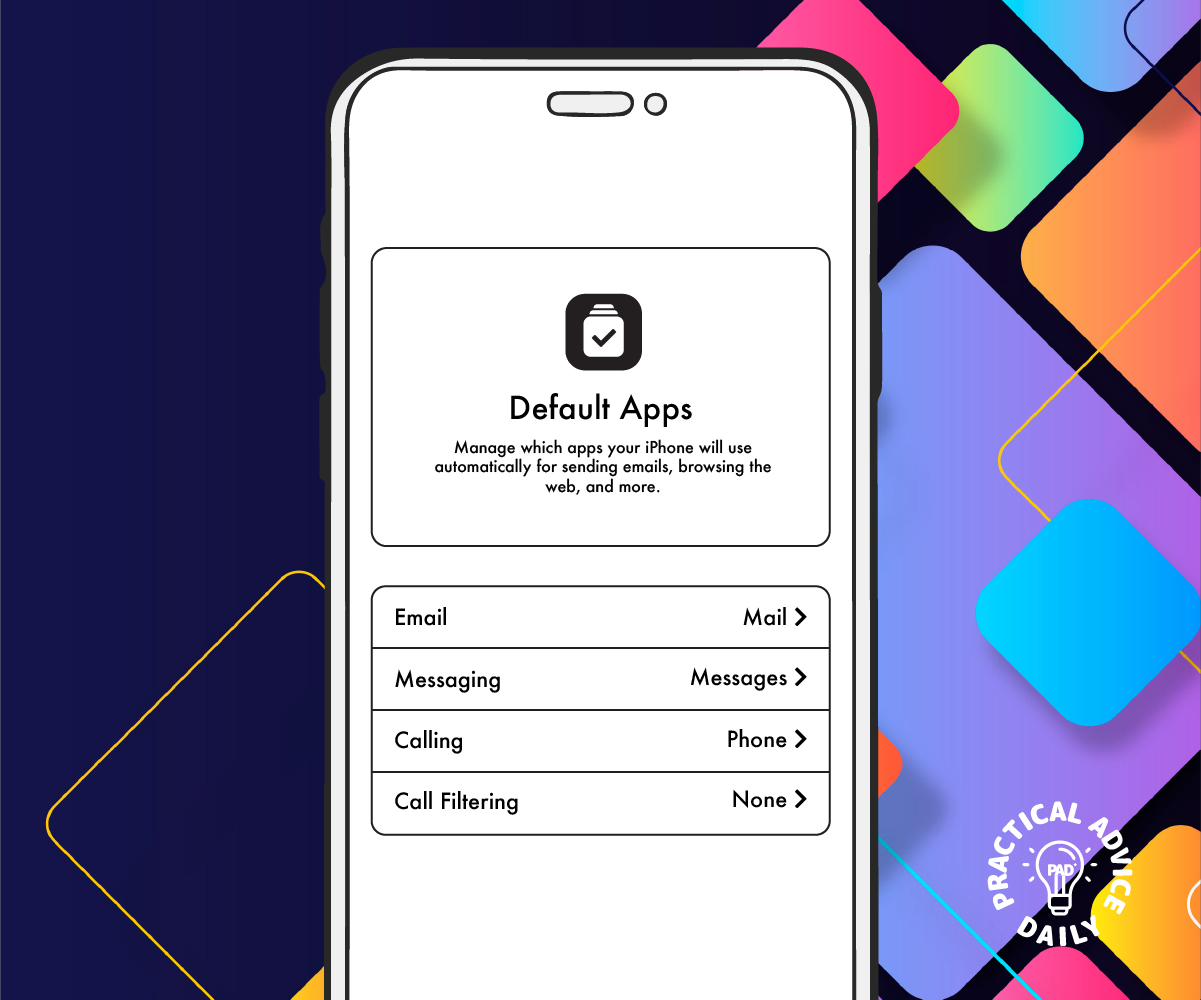
When you open a link, send an email, or get directions on your iPhone, it automatically uses Apple’s built-in apps. But did you know you can change the default apps to ones you prefer? If you like using Chrome instead of Safari, Gmail instead of Mail, or Google Maps instead of Apple Maps, this guide will show you how to set them as your default apps.

Follow these easy steps to customize your iPhone to your liking.

Table of Contents

Changing Your Default Web Browser

Want to use Google Chrome, Firefox, or another browser instead of Safari? Here’s how:

  1. Open the Settings app on your iPhone.
  2. Scroll down and tap on the browser you installed (e.g., Chrome, Firefox).
  3. Tap Default Browser App.
  4. Select your preferred browser from the list.

Now, any links you open will use your new default browser instead of Safari.

Changing Your Default Email App

If you prefer using Gmail, Outlook, or another email app over Apple’s Mail app, follow these steps:

  1. Open the Settings app.
  2. Scroll down and tap on the email app you want to set as default (e.g., Gmail, Outlook).
  3. Tap Default Mail App.
  4. Choose your preferred email app.

All email links will now open in your chosen email app instead of Apple Mail.

Changing Your Default Maps App

By default, Apple Maps is used for directions, but you can switch to Google Maps or Waze:

  1. Unfortunately, Apple does not allow setting a different maps app as the default.
  2. However, you can still use Google Maps or Waze by opening links manually or setting them as the preferred option in apps like Gmail.
  3. If using Siri, say, “Give me directions on Google Maps” to bypass Apple Maps.

Changing Your Default Music App

You can set Spotify or another music app as your preferred choice:

  1. Ask Siri: “Play [song name] on Spotify.”
  2. Siri will ask if you want to set Spotify as your default music app.
  3. Confirm your choice.

Now, when you ask Siri to play music, it will use your selected app instead of Apple Music.

Changing Your Default Messaging App (Limited Options)

Apple does not allow changing the default messaging app for SMS and iMessage. However, you can use apps like WhatsApp or Messenger for non-SMS messaging by manually opening those apps.

Final Tips

  • Ensure your preferred apps are installed before trying to set them as default.
  • If an option is missing, check if your iPhone is updated to the latest iOS version.
  • Some default settings (like Messages and Maps) cannot be changed but have workarounds.

By following these steps, you can make your iPhone