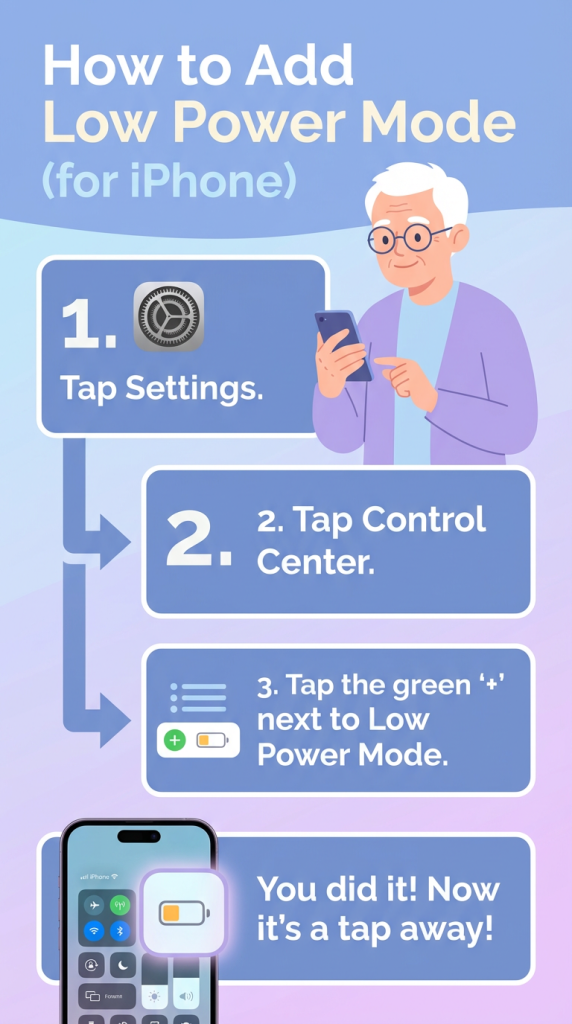
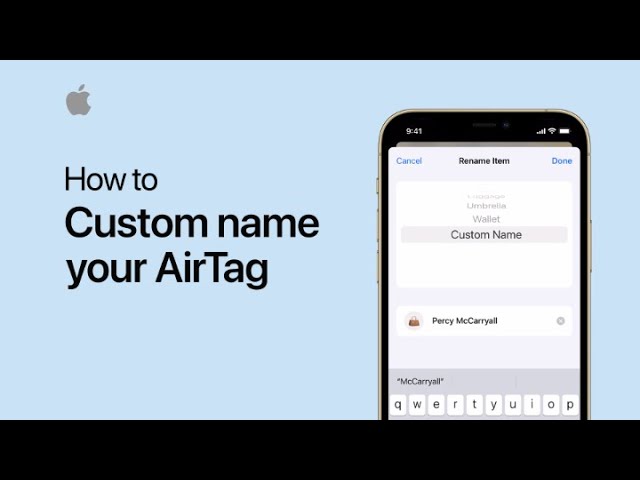
How to use background sounds on your Mac | Apple Support

In macOS Ventura, you can play ambient background sounds on your Mac. Start by clicking the Apple menu, then go to System Settings, followed by Accessibility, and select Audio. Turn on background sounds, and the sound will play immediately. You can choose different sounds, like Ocean or Rain, and the first time you select one, a high-quality version will download. Adjust the sound volume using the slider, and you can set it to stop automatically when your Mac enters screen saver mode. This feature is great for enhancing focus or relaxation.

Summary:
– In macOS Ventura, play ambient sounds through System Settings.
– Access this via Apple menu > System Settings > Accessibility > Audio.
– Turn on background sounds, with options like Rain or Ocean.
– Adjust the volume using a slider and change sounds as needed.
– Sounds can stop automatically when the screen locks or enters screen saver mode.

How to switch faces on Apple Watch | Apple Support

Starting in watchOS 10.2, you can easily swipe between Apple Watch faces. To enable this feature, press the Digital Crown to access your apps, then go to Settings and tap on Clock. From there, turn on “Swipe to Switch Watch Face.” Once activated, press the Digital Crown to return to your watch face, and you can now switch between the faces you’ve set up by swiping left or right from the edge of the screen. This allows you to change faces quickly with just a swipe.

Summary:
– In watchOS 10.2, you can swipe between Apple Watch faces.
– Access your apps by pressing the Digital Crown.
– In Settings, go to Clock and turn on “Swipe to Switch Watch Face.”
– Return to your watch face, and swipe left or right to switch between faces.
– Easily change watch faces with a swipe from the screen’s edge.

How to use Find My on Apple Watch | Apple Support

With the Find My app on your Apple Watch, you can locate lost devices, items, and share your location with friends and family. Once you’re signed into your Apple ID, Find My is automatically set up. Use the Find Devices app to locate missing Apple devices, such as iPhones or iPads, and the Find Items app for AirTagged belongings. If nearby, you can play a sound, or use the map to track its location. You can also turn on Lost Mode to lock the device and display a contact message. Additionally, the Find People app lets you easily share your location with others.

Summary:
– Use Find My on Apple Watch to locate lost devices or items with AirTags.
– Automatically set up when signed into your Apple ID.
– Play a sound, view on a map, or enable Lost Mode to lock missing devices.
– Use the Find People app to share your location with friends and family.
– Stay connected and track important items directly from your wrist.

How to use Apple Pay in stores | Apple Support

To use Apple Pay in stores, look for the contactless symbol or Apple Pay logo. Double-click the side button on an iPhone with Face ID or the Home button on an iPhone with Touch ID, then authenticate with Face ID, Touch ID, or a passcode. Your default card will appear, or you can select another card. Hold the top of your iPhone near the contactless reader, and once the transaction is complete, you’ll hear a chime and see a confirmation with a check mark on your screen. This allows you to make secure, quick purchases with Apple Pay.

Summary:
– Look for the contactless symbol or Apple Pay logo to use Apple Pay.
– Double-click the side button or Home button, then authenticate with Face ID, Touch ID, or a passcode.
– Your default card appears, but you can switch cards if needed.
– Hold your iPhone near the contactless reader to pay.
– A chime and confirmation message will appear once the transaction is complete.

How to add faces for Apple Watch on iPhone | Apple Support

To customize your Apple Watch face using your iPhone, open the Watch app and tap Face Gallery. Select a watch face from the gallery, then personalize it by adjusting options like color, style, and complications. To modify a complication, scroll down, tap on the one you want to change, and choose a new one from the list. Once you’ve made your adjustments, tap Add to save the customized face to My Faces. Keep in mind that some watch faces may not be available on all Apple Watch models or in all regions.

Summary:
– Open the Watch app on your iPhone and tap Face Gallery.
– Choose a watch face and customize options like color, style, and complications.
– To change a complication, scroll, tap it, and select a new one from the list.
– Tap Add to save the customized face to My Faces.
– Note that some watch faces may not be available on all models or in all regions.

How to recover and restore your Apple Watch | Apple Support

If your Apple Watch shows an iPhone and Apple Watch icon or a red exclamation point, you may need to recover it. First, ensure your watch is charged to at least 50% and remains on its charger throughout the process. Also, confirm your iPhone is updated to iOS 15.4 or later, and both devices are connected to Wi-Fi and Bluetooth.

If a recovery screen appears, or if you see a red exclamation point, double-click the side button to bring it up. Place your iPhone and Apple Watch close together, tap Continue on your iPhone, and enter the code displayed on the watch. The recovery process will start, updating your watch to the latest version of watchOS. Your watch will restart once recovery is complete, displaying your selected watch face and complications. For further assistance, contact Apple Support.

Summary:
– Ensure your Apple Watch is charged to at least 50% and keep it on the charger.
– Verify your iPhone is updated to iOS 15.4 or later, and both devices are connected to Wi-Fi and Bluetooth.
– If a recovery screen appears or you see a red exclamation point, double-click the side button on your watch.
– Bring your iPhone close to your Apple Watch, tap Continue on your iPhone, and enter the code shown on the watch.
– The recovery process will update your watch to the latest watchOS version and restart it, displaying your watch face and complications.

How to update your Apple Watch | Apple Support

To update your Apple Watch, first ensure your iPhone is running the latest iOS and that both devices are connected to Wi-Fi. Make sure your watch is charged to at least 50% and remains on its charger throughout the process. To update directly on the watch, go to the Home Screen, open Settings, tap General, and then Software Update. Tap Install or Download and Install if needed, and follow the onscreen instructions. For updating via your iPhone, open the Apple Watch app, go to the My Watch tab, tap General, and then Software Update. Agree to terms if prompted, tap Install or Download and Install, and enter your passcode if needed. Keep both devices near each other and on their chargers until the update is complete.

Summary:
– Ensure your iPhone is updated to the latest iOS, and both devices are connected to Wi-Fi.
– Charge your Apple Watch to at least 50% and keep it on the charger during the update.
– To update directly on the watch, go to Settings > General > Software Update, then tap Install or Download and Install.
– To update using your iPhone, open the Apple Watch app, go to My Watch > General > Software Update, then tap Install or Download and Install.
– Keep both devices near each other and on their chargers until the update finishes.

How to free up space on your Mac on macOS Catalina or earlier — Apple Support

To free up space on your Mac, start by making a Time Machine backup to avoid losing any important files. Check your storage usage by going to the Apple menu, selecting “About This Mac,” and clicking the Storage tab. Click “Manage” to see recommendations such as storing files in iCloud, optimizing storage by removing watched TV shows and movies, enabling automatic trash emptying, and reducing clutter by identifying large files and unused apps. For manual space management, sort applications and files by size or last accessed date in the Manage Storage section, delete unnecessary items, or move large files to an external drive.

Summary:
– Backup your files using Time Machine before starting.
– Check storage usage by going to Apple menu > About This Mac > Storage tab.
– Use “Manage” for recommendations like storing files in iCloud, optimizing storage, and emptying Trash automatically.
– Manually delete large files and unused apps from the Manage Storage section or Finder.
– Consider moving large files to an external drive for additional space.

How to reinstall macOS from macOS Recovery — Apple Support

To reinstall macOS using macOS Recovery, first ensure your Mac is connected to the internet, plugged in, and turned off. If using a wireless keyboard, connect it via USB or use a wired or built-in keyboard. Start up your Mac and immediately press and hold one of these key combinations: Command-R to reinstall the latest macOS, Option-Command-R to upgrade to the latest compatible version, or Shift-Option-Command-R to reinstall the original macOS or a close version. Release the keys when you see the Apple logo or a startup screen. Enter your password if prompted, then choose “Reinstall macOS” from the Utilities window and follow the on-screen instructions. Select the disk for installation, and wait for the process to complete without interrupting. Once done, enter your password at the login window to finish the setup.

Summary:
– Ensure your Mac is connected to the internet, plugged in, and turned off before starting.
– Use the appropriate key combination at startup: Command-R (latest version), Option-Command-R (latest compatible version), or Shift-Option-Command-R (original or closest version).
– Release the keys when you see the Apple logo, enter your firmware or admin password if prompted, and select “Reinstall macOS” in the Utilities window.
– Follow the on-screen instructions to choose the installation disk and complete the process, which may involve multiple restarts and progress bars.
– Once installation is complete, log in with your password and follow any additional prompts.

How to import bookmarks, history, and passwords to Safari from Chrome on your Mac — Apple Support

To import your bookmarks, history, and passwords from Chrome to Safari, start by opening Safari and clicking “File” in the menu bar. Then, choose “Import From” and select “Chrome.” Ensure that Chrome is installed on your Mac to complete the process. Next, select the items you wish to import and click “Import.” Once the import is complete, click “OK” to finish. This process helps you quickly set up Safari with your existing data from Chrome.

Summary:
– Open Safari and click “File” in the menu bar.
– Choose “Import From” and select “Chrome.”
– Ensure Chrome is installed on your Mac for the import to work.
– Select the items (bookmarks, history, passwords) you want to import and click “Import.”
– Click “OK” once the import is complete to finish the process.