How to Recover Deleted Photos and Videos on iPhone

Accidentally deleting photos and videos can be frustrating, but don’t worry—your iPhone has built-in tools to help you recover them. If needed, third-party recovery options can also help. Follow this step-by-step guide to get your lost media back.

Table of Contents

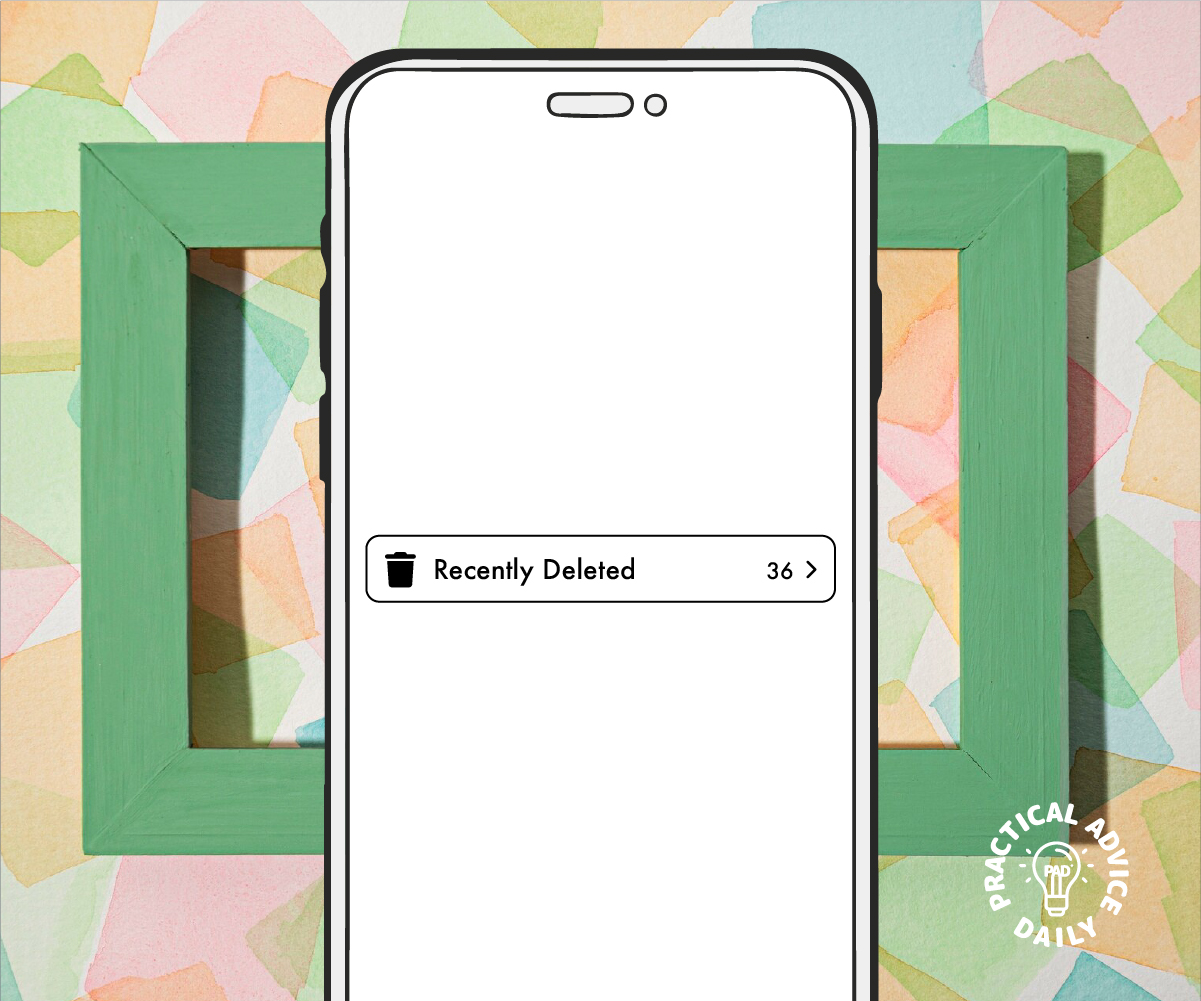
Method 1: Recover from the “Recently Deleted” Album

Your iPhone automatically stores deleted photos and videos in a special folder for 30 days before permanently removing them. Here’s how to retrieve them:

  1. Open the Photos app on your iPhone.
  2. Tap on Albums at the bottom of the screen.
  3. Scroll down and select Recently Deleted under “Utilities.”
  4. Browse through the deleted items and find the photo or video you want to restore.
  5. Tap on the photo or video, then tap Recover (or select multiple and tap Recover All).
  6. The recovered item will be restored to its original album.

Note: If the item has been deleted for more than 30 days, it will no longer be in the Recently Deleted album.

Method 2: Restore from iCloud Backup

If the photo or video is no longer in the Recently Deleted album, you may be able to recover it from an iCloud backup. Here’s how:

  1. Check iCloud Photos:
    • Go to Settings > [Your Name] > iCloud > Photos.
    • Ensure that iCloud Photos is turned on.
    • Visit iCloud.com on a computer, sign in, and check if the photo is in the Photos section.
  2. Restore an iCloud Backup (Last Resort)
    • Go to Settings > General > Transfer or Reset iPhone > Erase All Content and Settings.
    • Follow the setup steps and choose Restore from iCloud Backup.
    • Select a backup from before the photos or videos were deleted.

Warning: This will erase your iPhone and restore it from the selected backup, so back up your current data first.

Method 3: Use Third-Party Recovery Apps

If you don’t have a backup, third-party recovery tools can help scan your device for lost photos and videos. Some popular options include:

  • Dr.Fone – Data Recovery
  • iMobie PhoneRescue
  • Tenorshare UltData

How to Use a Recovery App:

  1. Download and install the recovery app on your computer.
  2. Connect your iPhone to the computer using a USB cable.
  3. Follow the on-screen instructions to scan for deleted files.
  4. Select the photos and videos you want to restore and save them to your device.

Note: These apps are not always guaranteed to work, and some require a paid version for full recovery.

Prevent Future Data Loss

To avoid losing important photos and videos in the future, consider these tips:

Final Thoughts

Losing photos and videos can be stressful, but with these recovery methods, you have a good chance of getting them back. Start with the Recently Deleted album, check your iCloud backups, and use third-party apps if necessary. By backing up your media regularly, you can prevent future data loss.

If you found this guide helpful, share it with friends and family who might need it!

How to sign a document with Markup on your iPhone | Apple Support

practhumb34.2

You can sign documents using Markup on your iPhone by accessing the attachment in an email, tapping the Markup button, and selecting the “+” button to add your signature. After signing, it’s automatically saved for future use. You can resize and reposition the signature as needed. Once done, choose how to send or save the document. Subscribe to the Apple Support YouTube channel for more helpful tips like this.

Summary:
– Use Markup on iPhone to sign documents.
– Access attachments in emails and tap the Markup button.
– Select the “+” button to add your signature.
– Resize and reposition the signature as needed.
– Choose how to send or save the signed document.

Simple but Effective Way To Clear Safari Cache

Browsing the web on your iPhone should be quick and easy, but over time, Safari can slow down due to stored cache, cookies, and browsing data. Clearing this data can help improve browsing speed and free up storage space. If you’re new to iPhones or technology in general, don’t worry—this guide will walk you through the process step by step.

Table of Contents

Why Should You Clear Safari Cache?

Regularly clearing Safari’s cache helps:

Step-by-Step Guide to Clearing Safari Cache on iPhone

Follow these simple steps to clear your browsing data:

1. Open the Settings App

  • Locate and tap the Settings icon on your iPhone’s home screen.

2. Scroll Down and Select Safari

  • Scroll through the list and find Safari—tap on it to open Safari’s settings.

3. Tap on “Clear History and Website Data”

  • This option is located in the middle of the page.

4. Confirm Your Action

  • A pop-up will appear asking if you want to clear history and data. Tap Clear History and Data to confirm.

✅ That’s it! Your Safari cache, cookies, and browsing data have been cleared

Additional Tips for Better Browsing Performance

By following these simple steps, you can enjoy a faster and more efficient browsing experience on your iPhone. Regularly clearing Safari’s cache is a small but effective habit that keeps your device running smoothly!

How to save a template in Reminders on iPhone and iPad | Apple Support

practhumb33.2

In Reminders, creating templates saves time for recurring tasks. Open a list, tap “More,” then “Save as Template,” name it, and choose whether to include completed reminders. To use a template, tap “Add List,” “Templates,” select one, rename if needed, then tap “Create” to begin. Templates streamline list-making for various occasions.

Summary:
– Reminders offers template creation for efficient list-making.
– Access templates by tapping “Add List” and then “Templates.”
– Saved templates can include completed reminders.
– Users can rename templates before use.
– Creating templates streamlines list creation for various occasions.

How to use Detection Mode in Magnifier on iPhone or iPad with LiDAR | Apple Support

practhumb32.2

Detection Mode and Magnifier on iOS devices equipped with LiDAR technology offer blind or low-vision users enhanced navigation tools for unfamiliar environments. Detection Mode provides rich descriptions, including door detection with instructions, people detection, and image descriptions. Users can customize settings in Magnifier to enable sound, speech, or haptic feedback for different detection types. Triple-tapping with VoiceOver activates Detection Mode. Users can activate Detection Mode in Magnifier and customize it based on their needs, receiving detailed information about nearby objects and people. However, it’s cautioned against relying on Detection Mode in high-risk or emergency situations.

Summary:
– Detection Mode and Magnifier aid blind or low-vision users.
– Utilizes LiDAR technology for rich environmental descriptions.
– Features include door detection with instructions, people detection, and image descriptions.
– Customizable settings for sound, speech, or haptic feedback.
– Cautioned against reliance in high-risk or emergency situations.

How to Offload Unused Apps Without Losing Data on Your iPhone

Your iPhone can fill up with apps you rarely use, taking up valuable storage space. Instead of deleting them, you can use the Offload Unused Apps feature. This lets you free up space while keeping your app data intact, so you can pick up where you left off if you reinstall the app later. Here’s how it works and how you can use it.

Table of Contents

What Is Offloading Apps?

Offloading an app removes it from your iPhone but keeps its data saved. If you reinstall the app, all your settings, logins, and files will still be there. This is different from deleting an app, which erases everything.

Why Offload Apps?

  • Frees up storage space on your iPhone.
  • Keeps your app data, so you don’t lose progress or saved files.
  • Automatically offloads apps you don’t use often (if enabled).

How to Offload Unused Apps Manually

Follow these simple steps to offload an app:

  1. Open the Settings app on your iPhone.
  2. Tap General > iPhone Storage.
  3. Scroll through the list of apps and select the one you want to offload.
  4. Tap Offload App, then confirm by tapping Offload App again.
  5. The app will be removed, but its icon will stay on your home screen with a small cloud symbol.

How to Automatically Offload Unused Apps

If you want your iPhone to offload apps automatically when storage is low, enable this setting:

  1. Open Settings.
  2. Tap App Store.
  3. Scroll down and toggle on Offload Unused Apps.

This will automatically remove apps you don’t use often but keep their data safe.

How to Reinstall an Offloaded App

If you want to use an offloaded app again, here’s how to get it back:

  • Tap the app’s icon on your home screen. Your iPhone will start downloading it again.
  • Alternatively, go to the App Store, search for the app, and tap the download button.

Once the app is reinstalled, all your data will be restored.

Final Thoughts

Offloading apps is a simple yet powerful way to manage your iPhone storage without losing important data. By using this feature, you can keep your device running smoothly while ensuring that your essential information is safe and accessible whenever you need it.

Try it out and enjoy a clutter-free iPhone without the stress of losing your files!

How to use Safety Check on your iPhone | Apple Support

practhumb31.2

In iOS 16, Safety Check allows quick resetting of sharing access for enhanced personal safety. In Settings, navigate to Privacy and Security, then Safety Check. Emergency Reset immediately removes access from all people and apps. Manage Sharing and Access enables detailed review and adjustments, including stopping specific information sharing, app access, device removal, updating passwords, and managing emergency contacts. After completion, additional privacy and safety considerations are provided. Access the Personal Safety User Guide for comprehensive assistance.

Summary:
– iOS 16 introduces Safety Check for swift sharing access reset, prioritizing personal safety.
– Access Safety Check via Settings > Privacy and Security > Safety Check.
– Emergency Reset swiftly removes access from all contacts and apps.
– Manage Sharing and Access offers granular control, allowing users to stop specific information sharing, app access, remove devices, update passwords, and manage emergency contacts.
– Additional privacy and safety considerations are provided, along with access to the Personal Safety User Guide for comprehensive assistance.

How to personalize your Contact Poster on your iPhone | Apple Support

practhumb30.2

In iOS 17, users can create personalized contact posters for communication. They start by ensuring their Apple ID is signed in and their contact card is updated. Within the Contacts app, users tap “My Card” and then “Contact Photo and Poster” to begin customization. They can choose a style, add a photo, apply filters, and adjust background colors. Fonts and sharing preferences are customizable too. Once created, the poster appears when contacting others using iOS 17. Users can share it automatically with all contacts or select individuals. This feature enhances communication and personalization on iPhones.

Summary:
– In iOS 17, users can create personalized contact posters for communication.
– Start by ensuring Apple ID is signed in and the contact card is updated.
– Within Contacts app, tap “My Card” then “Contact Photo and Poster” to begin customization.
– Choose a style, add a photo, apply filters, adjust background colors, and customize fonts.
Share the poster automatically with all contacts or select individuals, enhancing communication on iPhones.

Speed Up a Slow iPhone

Is your iPhone running slower than usual? Over time, your device can become sluggish due to background apps, cluttered storage, or outdated software. The good news is that you don’t need to be a tech expert to fix it! Here are some easy and practical solutions to help speed up your iPhone.

Table of Contents

1. Close Unused Apps

Apps running in the background can slow down your iPhone.

  • Swipe up from the bottom of the screen (or double-click the Home button on older models).
  • Swipe away any apps you’re not using.

2. Restart Your iPhone

A simple restart can refresh your device and improve performance.

  • Hold down the Power button and Volume button (for newer models) or the Power button alone (for older models) until the power-off slider appears.
  • Slide to turn off your iPhone.
  • Wait a few seconds, then turn it back on.

3. Free Up Storage Space

A full storage can slow down your iPhone. Try these steps:

  • Delete unused apps: Press and hold an app icon, then tap Remove App.
  • Clear old photos and videos: Open the Photos app, go to Albums > Recently Deleted, and permanently remove them.
  • Offload unused apps: Go to Settings > General > iPhone Storage and tap an app to offload it while keeping its data.

4. Update Your Software

Keeping your iPhone updated ensures it runs smoothly.

  • Open Settings.
  • Tap General > Software Update.
  • If an update is available, tap Download and Install.

5. Reduce Background Activity

Too many background processes can slow things down.

  • Turn off Background App Refresh: Go to Settings > General > Background App Refresh and choose Off or Wi-Fi only.
  • Reduce motion effects: Go to Settings > Accessibility > Motion and turn on Reduce Motion.

6. Clear Safari Cache

If Safari is slow, clearing its cache can help.

  • Go to Settings > Safari.
  • Tap Clear History and Website Data.
  • Confirm by tapping Clear History and Data.

7. Reset All Settings

If your iPhone is still slow, resetting settings might help.

  • Go to Settings > General > Transfer or Reset iPhone.
  • Tap Reset > Reset All Settings (this won’t delete your data, just resets settings to default).

Final Thoughts

These simple steps can help bring your iPhone back up to speed. Try them one by one, and you’ll notice a difference in performance. If your iPhone is still slow after trying these fixes, it may be time to consult Apple Support.

How to use mental health features on iPhone | Apple Support

practhumb29.2

The iOS 17 Mental Health features promote emotional awareness and resilience. Users can log emotions or moods in the Health app, customize notifications for mood logging, and receive insights based on their logs. The app provides articles on mental health and self-care and allows users to manage reminder schedules. With options like mindfulness logging and mood tracking, users can improve their well-being and monitor their mental health effectively.

Summary:
– iOS 17 introduces Mental Health features for emotional awareness.
Users can log emotions or moods in the Health app.
– Customizable notifications remind users to log their feelings.
– The app provides insights based on logged data.
– Users can access articles on mental health and self-care, manage reminder schedules, and track their well-being effectively.