How to remove duplicates in Photos on iPhone | Apple Support

practhumb115

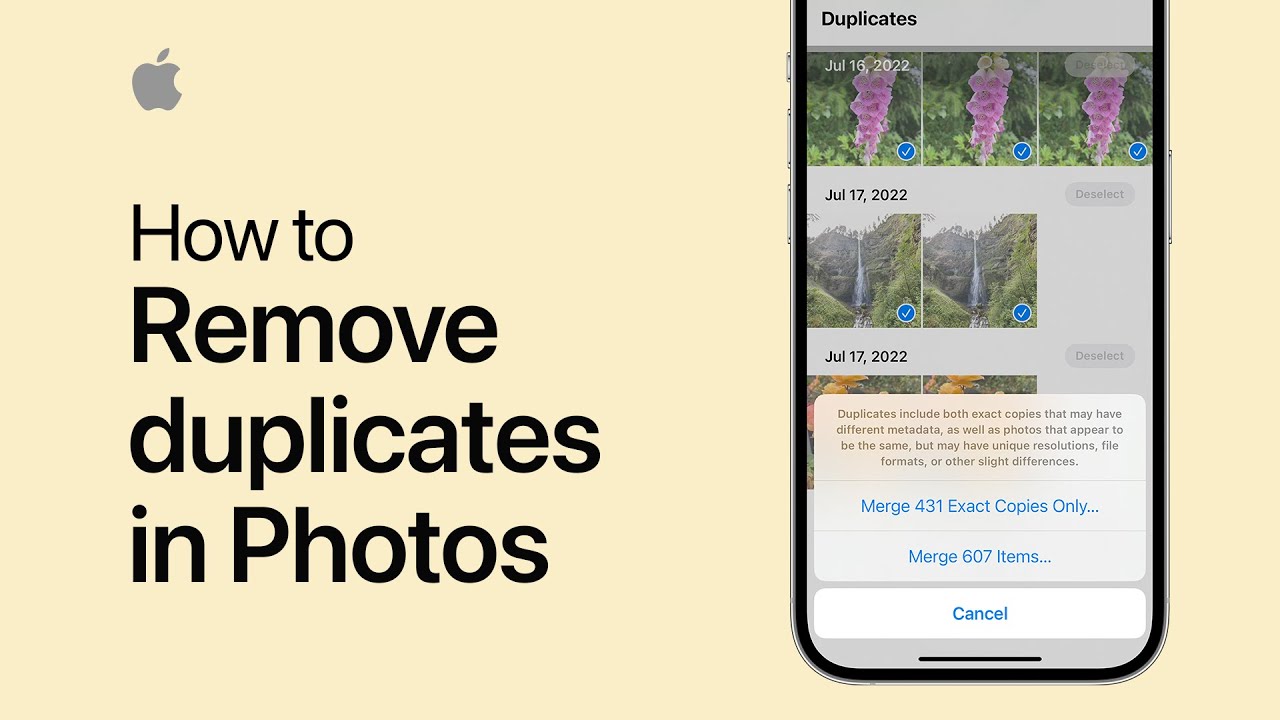
In iOS 16, the Photos app can detect and manage duplicate photos efficiently. Start by accessing the Albums tab, then scroll down and select “Duplicates.” If no duplicates are found, allow more time for analysis. Tap “Select,” then choose the photos you want to merge or select all. Confirm by tapping “Merge.” The app offers the option to merge exact duplicates or those with slight variations. Merged duplicates retain the highest quality and relevant data like captions and favorites. Removed duplicates are stored in the “Recently Deleted” folder. This process streamlines your photo library and enhances organization.

Summary:
– In iOS 16, Photos app can identify and manage duplicate photos efficiently.
– Access the “Duplicates” section under the Albums tab in the Photos app.
– Select the photos to merge or choose “Select All” and confirm by tapping “Merge.”
– Options are available to merge exact duplicates or those with slight variations.
– Merged duplicates maintain the highest quality and relevant data while removed duplicates are stored in the “Recently Deleted” folder.

How to locate an unknown AirTag moving with you on iPhone | Apple Support

If you receive a notification on your iPhone lock screen about an unknown AirTag moving with you, ensure that Location Services, Bluetooth, and Tracking Notifications are on. Tap the alert, then “Continue” to view a map on Find My, showing where the AirTag was detected near your device. Listen for the sound if you need to locate it further, then swipe up on the item card for more options. If you recognize the AirTag owner, tap “Pause Safety Alerts”; otherwise, tap “Learn About This AirTag” to disable it. Follow the on-screen instructions to disable the AirTag permanently. That’s how you deal with a moving AirTag.

Summary:
– If you get a notification of an unknown AirTag moving with you, ensure location services, Bluetooth, and tracking notifications are enabled.
– Tap the notification and continue to view a map showing where the AirTag was detected near your device.
– Listen for the sound to help locate the AirTag, then swipe up for more options on the item card.
– If you recognize the AirTag owner, you can pause safety alerts; otherwise, learn about the AirTag and disable it if necessary.
– Follow on-screen instructions to permanently disable the AirTag and ensure your safety.

How to use tags in Reminders on iPhone, iPad, and iPod touch | Apple Support

You can add tags to reminders in your iCloud account for easy organization. When creating or editing a reminder, tap the tag button in the quick toolbar and type a single word as your tag. Tap done to finish. To view all your tags, tap lists and scroll down to the tag browser. Tap a tag to see reminders with that tag across all your lists. This method improves organization and retrieval of reminders.

Summary:
Add tags to reminders in iCloud for easy organization.
– Tap the tag button in the quick toolbar when creating or editing a reminder.
– Type a single word as your tag and tap done.
– View all tags by tapping lists and scrolling to the tag browser.
– Tap a tag to see all reminders with that tag across lists.

How to assign a name to a person in Photos on your iPhone and iPad | Apple Support

practhumb111

To easily find pictures of friends and family, tag them in Photos by selecting a picture with their face, tapping the info button, and then tapping the face with a question mark. Choose “Tag with Name,” type their name, and select from your contacts if applicable. Confirm by tapping done in the upper right corner. This helps organize and locate photos of specific people effortlessly.

Summary:
– Select a photo with a person’s face in the Photos app.
– Tap the info button and then tap the face with a question mark.
– Tap “Tag with Name,” type the person’s name, and select from contacts if available.
– Confirm by tapping done in the upper right corner.
– This helps easily find and organize pictures of friends and family.

How to view your locked Hidden album on iPhone | Apple Support

practhumb110

Starting in iOS 16, your hidden album in Photos is locked by default. To view it, open the Photos app, go to the Albums tab, and scroll down to the Utilities section to find your hidden album. Use Face ID, Touch ID, or your passcode to unlock it. To change access settings, go to Settings, tap Photos, and toggle the switch next to Use Face ID, Touch ID, or passcode based on your device model. When this switch is on, your hidden album is locked. For more tips, subscribe to the Apple Support YouTube channel.

Summary:
– Hidden album in Photos is locked by default in iOS 16.
– To view, go to Albums tab in Photos, scroll to Utilities, and tap Hidden album.
Authenticate with Face ID, Touch ID, or passcode to access.
– Change access settings in Settings > Photos and toggle the lock switch.
– Locking options vary by device model (Face ID, Touch ID, or passcode).

How to use SharePlay via Messages on iPhone | Apple Support

practhumb109

You can use SharePlay to watch a movie or listen to music with friends while chatting in Messages. First, touch and hold the content in a supported app or tap the more button, then tap SharePlay. Add your contacts, tap the Messages button, enter a message, and send the invitation. Once your contacts join, tap Start to begin playing. Tap the Messages button to return to chatting. While listening and chatting, you can access playback controls by touching and holding the dynamic Island. To end the session, tap the X in the SharePlay controls. This keeps everyone in sync with SharePlay.

Summary:
– Use SharePlay to watch movies or listen to music with friends while chatting in Messages.
– Touch and hold the content in a supported app, tap the more button, then tap SharePlay.
– Add contacts, tap Messages, enter a message, and send the invitation.
– Once contacts join, tap Start to begin playback and return to Messages for chatting.
– Access playback controls by touching and holding the dynamic Island; end the session by tapping the X in the SharePlay controls.

How to stack widgets on your iPhone Home Screen | Apple Support

practhumb108

Organize your iPhone home screen by stacking widgets in one place. Touch and hold an app or empty space on your home screen until the apps jiggle, then drag one widget on top of another of the same size to create a stack. You can add up to 10 widgets in a stack. Tap “Done” in the upper right corner when finished. Smart Stacks will automatically show the most relevant information throughout the day, and you can swipe through them to switch to a different widget. For more iPhone tips, subscribe to the Apple Support YouTube channel.

Summary:
Organize your iPhone home screen by stacking widgets.
– Touch and hold an app or empty space until the apps jiggle.
– Drag one widget on top of another of the same size to create a stack.
You can add up to 10 widgets in a stack and tap “Done” when finished.
– Smart Stacks show relevant information throughout the day, and you can swipe to switch widgets.

How to set up a custom Focus on your iPhone or iPad | Apple Support

practhumb107

To set up a custom focus on your iPhone or iPad, open Control Center, then tap “Focus” and select “Custom.” Choose an icon color and name for your focus, such as “Travel.” Follow the on-screen instructions to complete the setup. To activate your custom focus, open Control Center again, tap “Focus,” and select the focus you created. Now, you’re ready to concentrate on your chosen activity, whether it’s travel or any other task you need to focus on.

Summary:
– Open Control Center on your iPhone or iPad.
– Tap “Focus” and select “Custom.”
– Choose an icon color and name for your focus.
– Follow on-screen instructions to finish setting up your custom focus.
– To activate, reopen Control Center, tap “Focus,” and select your custom focus.

How to use Apple Pay | Apple Support

practhumb106

With Apple Pay, you can effortlessly make purchases in stores, online, and in apps using your Apple devices, ensuring security and privacy. Start by signing in with your Apple ID on any device you want to use with Apple Pay. On your iPhone, open the Wallet app, tap the plus sign, and add a credit or debit card either by scanning it with the camera or entering the information manually.

Once added, you can verify it for use on your Apple Watch as well. Look for the Apple Pay symbol when making purchases in person, at participating stores, restaurants, vending machines, or even for ride shares or public transit. To check out, authenticate with Face ID or Touch ID on your iPhone, or using your passcode if configured. When shopping online or in apps, simply select the Apple Pay option at checkout, confirm billing details, and you’re done. It’s a convenient and secure way to shop.

Summary:
– Apple Pay allows easy, secure, and private purchases in stores, online, and in apps using Apple devices.
– Start by signing in with your Apple ID on the desired device.
– In the Wallet app on your iPhone, add a credit or debit card by scanning it or entering the details manually.
– Authenticate using Face ID, Touch ID, or passcode when making purchases in person or online.
– Look for the Apple Pay symbol at checkout, confirm billing details, and complete the purchase securely and conveniently.

How to use Touch Accommodations on your iPhone or iPad | Apple Support

Customize your iPhone or iPad with Touch accommodations, altering how it responds to touch inputs. Begin by setting up Touch accommodations in Settings > Accessibility > Touch > Touch Accommodations. Enable “Hold Duration” for extra time to confirm taps, adjusting the duration as needed. Swipe gestures allow faster swiping, while “Ignore Repeat” prevents multiple taps within a timeframe from registering separately. “Tap Assistance” aids precise tapping, letting you choose initial or final touch location for taps and adjust gesture delay. Activate Touch accommodations and use features like hold duration to open apps or tap assistance to ensure accurate tapping, enhancing your device’s usability.

Summary:
– Customize touch response on iPhone or iPad with Touch accommodations.
– Access settings in Accessibility > Touch > Touch Accommodations.
– Enable “Hold Duration” for extended time to confirm taps.
– Utilize “Swipe Gestures” for quicker swiping without hold duration.
– Activate “Tap Assistance” to ensure precise tapping by selecting initial or final touch location.