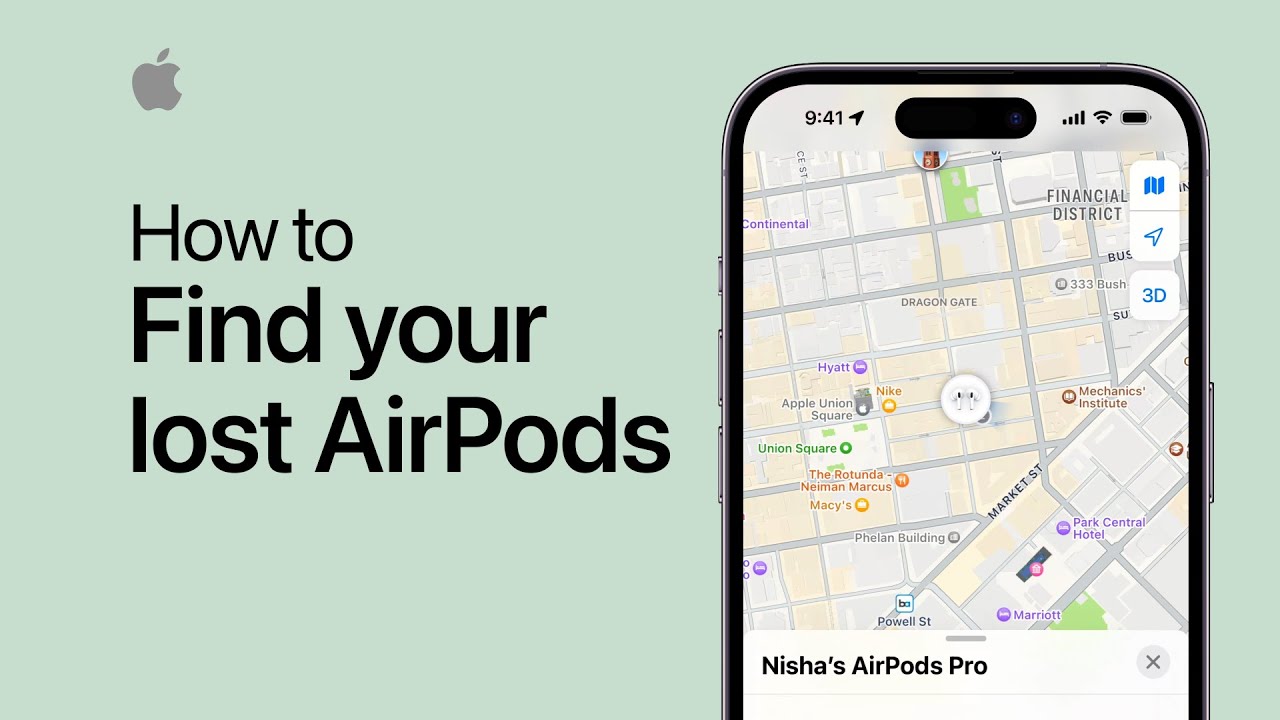
How to use Back Tap on iPhone | Apple Support

practhumb16.2

You can enable Back Tap on your iPhone by navigating to Settings, then Accessibility, and selecting Touch. Within the Touch settings, choose Back Tap, where you can assign actions to double or triple taps on the back of your device. Actions include going back, opening the App Switcher, and more. Once configured, you can double or triple tap firmly on the back of your iPhone to execute the chosen action efficiently. Finally, tap “Done” to save your settings.

Summary:
– Enable Back Tap on iPhone for actions.
– Access settings through Accessibility and Touch.
– Choose actions for double or triple taps on the back.
– Actions include going back or opening the App Switcher.
– Confirm settings and execute actions with double or triple taps.

How to use Journal on your iPhone | Apple Support

practhumb15.2

To use Journal on your iPhone, ensure it’s updated to iOS 17.2+. Open the Journal app, tap “Continue” to set up. Compose entries with suggestions like recent photos or music. Start a new entry or use a recommendation. Customize with text, photos, audio, location. Lock your journal for privacy using Face ID/Touch ID. Review and edit entries, access suggestions, and prompts. Explore personalized suggestions for ongoing journaling. Subscribe to Apple Support for more insights.

Summary:
Ensure iPhone is updated to iOS 17.2+.
– Open Journal app, tap “Continue” to set up.
– Compose entries with personalized suggestions.
– Customize entries with text, photos, audio, location.
– Lock journal for privacy using Face ID/Touch ID.

How to download maps to use offline on iPhone and iPad | Apple Support

practhumb14.2

In iOS 17, offline maps in the Maps app allow users to access directions and information without internet. Users download maps via Wi-Fi or Cellular, selecting areas and adjusting coverage. Notifications signal when maps are ready, which users can rename or delete. Suggestions based on contact info are provided, with customizable settings for offline use. Maps function seamlessly offline, offering details like directions and business information. Offline maps ensure navigation even without an internet connection, aiding users in reaching destinations. Availability varies by region.

Summary:
-iOS 17 introduces offline maps in the Maps app.
-Maps are downloaded via Wi-Fi or Cellular and offer directions without internet.
-Users select areas and adjust coverage, receiving notifications when maps are ready.
-Offline maps can be renamed, deleted, and function seamlessly offline with detailed information.
-Availability varies by region, enhancing navigation for users without internet access.

How to customize accessibility settings app by app on iPhone, iPad, and iPod touch | Apple Support

practhumb12.2

You can personalize accessibility settings for individual apps to suit your needs effectively. In Accessibility settings, select “Per App Settings,” then add the desired app. Customize settings such as text size, motion reduction, contrast, and others for optimal usability. Changes made will apply the next time you open the app, allowing for tailored accessibility adjustments app by app.

Summary:
– Accessibility settings can be customized on a per-app basis.
– Access “Per App Settings” in Accessibility settings.
– Add desired apps and customize settings such as text size and motion reduction.
– Changes apply to the specific app and enhance usability.
– Offers tailored accessibility adjustments for individual apps.

How to customize Control Center on iPhone, iPad, and iPod touch — Apple Support

practhumb11.2.1

Customize Control Center for easy access to frequently used features. In Settings, navigate to Control Center to add or remove controls. Use the “Add” or “Remove” buttons accordingly. Rearrange controls by touching and holding the gray lines, then moving them up or down. To access Control Center, swipe down from the top right corner of the screen or swipe up from the bottom edge on iPhones with a home button. Tap on desired controls to use them efficiently.

Summary:
– Customize Control Center in Settings to access frequently used features quickly.
– Add or remove controls using the respective buttons.
– Rearrange controls by touching and holding the gray lines.
– Access Control Center by swiping down from the top right corner or up from the bottom edge (on iPhones with a home button).
– Tap desired controls in Control Center to utilize them effectively.

How to transfer your data and set up your new iPhone | Apple Support

practhumb9.2

To transfer data to a new iPhone, three methods are outlined. If the previous iPhone is available, iCloud backup is recommended, ensuring apps and data download seamlessly. Another option is a direct transfer via Wi-Fi, although both devices are occupied during the process. If the old iPhone is absent, iCloud backup restoration is possible, requiring the latest backup and Apple ID. All methods entail following on-screen prompts, including setting up cellular service and an eSIM. Ultimately, each approach ensures a smooth transition to the new device, with apps and data continuously downloading in the background when connected to Wi-Fi.

Summary:
– Three methods for transferring data to a new iPhone are discussed.
– iCloud backup is recommended if the previous iPhone is available.
– Direct transfer via Wi-Fi is an option, but both devices are occupied during the process.
– iCloud backup restoration is possible even if the old iPhone is absent.
– Each method involves following on-screen prompts and ensures a smooth transition to the new device.

How to back up your iPhone to iCloud | Apple Support

practhumb8.2

Backing up your iPhone to iCloud is simple and essential for data security. In Settings, under iCloud, users can enable iCloud Backup and initiate the backup process with a single tap. Subscribing to the Apple Support YouTube channel provides additional guidance for utilizing iPhone features effectively.

Summary:
– iCloud backup for iPhones is crucial and easy.
– In Settings, navigate to iCloud and enable iCloud Backup.
– Users can initiate the backup process with a single tap.
– Subscribing to the Apple Support YouTube channel offers further guidance.
– Backing up ensures data security and ease of use.

How to use Dual SIM on your iPhone | Apple Support

practhumb6.2

Dual SIM functionality allows two cellular plans on one iPhone. Compatible with certain models, users must purchase or transfer a secondary plan. After activation, setup in settings includes labeling lines and choosing defaults for various services. Only two lines can be active simultaneously. Instructions include selecting default lines for calls, texts, iMessage, and FaceTime, and managing cellular data usage. Signal strength indicators differentiate between lines. Users can assign lines to contacts for default communication. Changing lines mid-call is also explained. Subscribe to Apple Support for further assistance.

Summary:
– Dual SIM enables two cellular plans on one iPhone.
– Compatible with specific iPhone models.
– Setup involves labeling lines and choosing defaults.
– Only two lines can be active simultaneously.
– Users can assign lines to contacts and change lines mid-call.

How to activate an eSIM on your iPhone | Apple Support

practhumb5.2

You can activate an eSIM on your iPhone during setup or later via Settings. Ensure your carrier supports eSIM and update iOS. If provided an eSIM, it activates during setup; otherwise, transfer your number using eSIM Quick Transfer. Complete setup, converting physical SIM to eSIM if needed. Follow carrier prompts to activate eSIM, possibly scanning a QR code. In Settings, navigate to Cellular > Set Up Cellular, or Add eSIM for additional lines, to activate or scan a QR code. Once done, your eSIM is ready for use. Subscribe to Apple Support for more iPhone tips.

Summary:
– Activate eSIM during iPhone setup or later via Settings.
– Ensure carrier supports eSIM and update iOS.
– Transfer number using eSIM Quick Transfer if eSIM not provided.
– Complete setup, converting physical SIM to eSIM if needed.
– Follow carrier prompts or scan QR code in Settings to activate eSIM.

How to erase your iPhone | Apple Support

practhumb4.2

To reset your iPhone to factory settings, ensure you have an iCloud or computer backup. On your iPhone, go to Settings > General > Reset > Erase All Content and Settings, enter your passcode, and follow prompts to turn off Find My and confirm erasure. Alternatively, on a Mac (Catalina or later) or PC with iTunes, disable Find My, connect your iPhone, trust the computer, select your device, and click Restore iPhone. Confirm erasure, wait for iOS installation, and your iPhone will restart. Follow on-screen setup instructions. Subscribe to Apple Support for more tips.

Summary:
Ensure you have an iCloud or computer backup before resetting.
– On iPhone: Go to Settings > General > Reset > Erase All Content and Settings.
– Enter passcode, disable Find My, and confirm erasure.
– On Mac (Catalina or later) or PC with iTunes: Disable Find My, connect iPhone, and select Restore iPhone.
– Confirm erasure, wait for iOS installation, and follow setup instructions after restart.