How to Fix Blurry iPhone Photos: Quick and Easy Methods

Ever taken a great photo only to find out it’s blurry? Don’t worry—you don’t need expensive software or expert skills to fix it! This guide will show you how to sharpen blurry iPhone photos using simple built-in tools and free apps. Let’s get started!

Table of Contents

Why Do iPhone Photos Turn Out Blurry?

Before fixing a blurry photo, it helps to know why it happens:

  • Camera Shake – Moving while taking a picture can cause blurriness.
  • Low Light – Poor lighting makes it harder for the camera to focus.
  • Dirty Lens – A smudged lens can make photos appear out of focus.
  • Motion Blur – Fast-moving subjects can create blur in pictures.

Simple Fixes Using the iPhone Photos App

Your iPhone has built-in tools to help sharpen blurry pictures. Here’s how to use them:

  1. Open the Photos App – Find the blurry photo you want to fix.
  2. Tap Edit (Top Right Corner) – This opens the editing options.
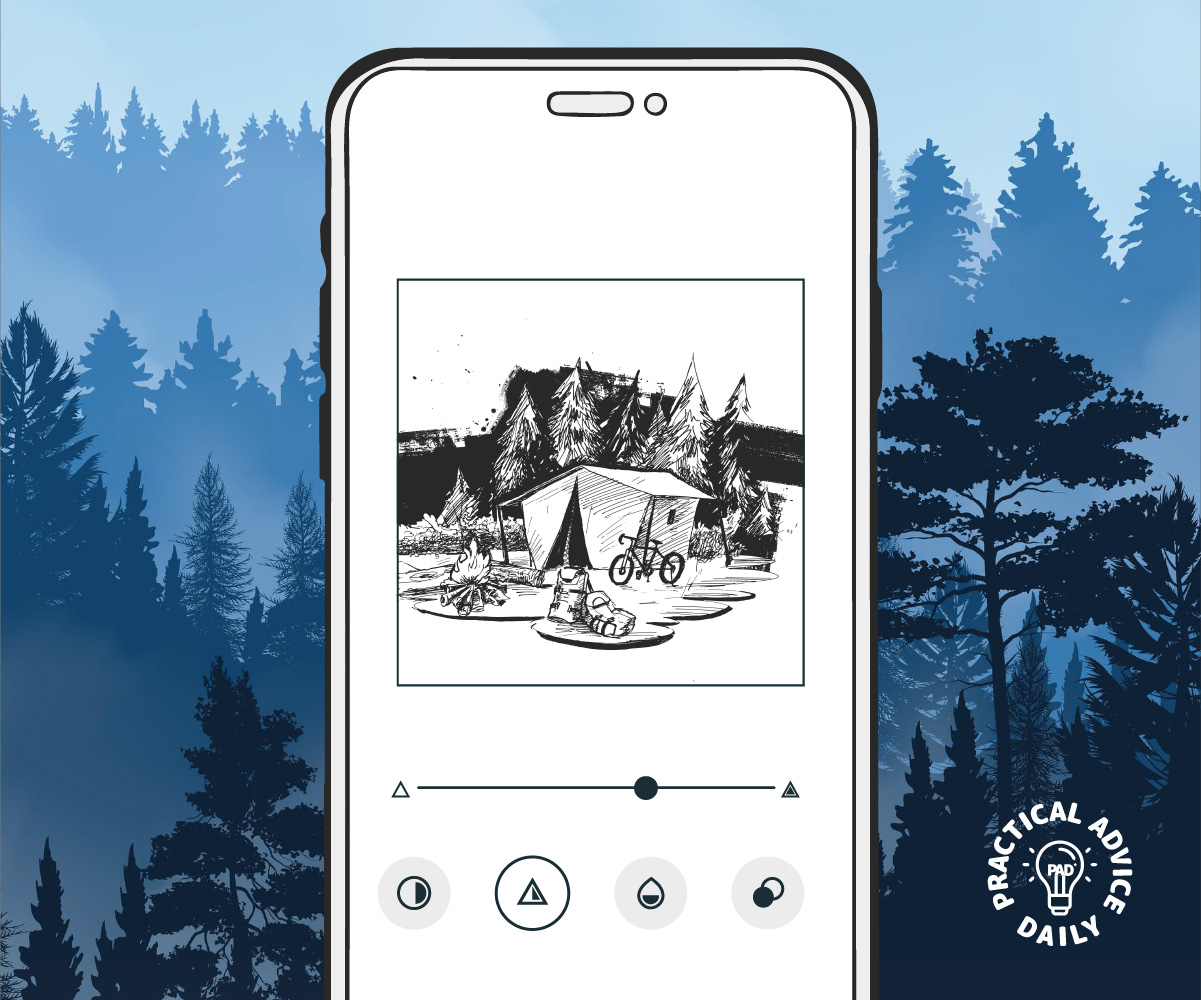
  3. Select the Sharpness Tool – Tap the adjustment button (looks like a dial) and choose Sharpness.
  4. Increase Sharpness – Slide the bar to the right to enhance details.
  5. Use Definition and Contrast – Adjust these settings to make edges clearer.
  6. Tap Done – Save your improved photo.

Using Free Apps to Sharpen Blurry Photos

If the built-in tools don’t give you the results you want, try these free apps:

1. Snapseed (By Google)

  • How to Use:
    • Open Snapseed and load your photo.
    • Tap Tools and select Details.
    • Adjust Sharpening and Structure to enhance clarity.
    • Save your photo when you’re happy with the result.

2. Remini

  • Best For: Fixing very blurry images with AI enhancement.
  • How to Use:
    • Upload your blurry photo.
    • Let the app apply AI sharpening.
    • Save and share your improved image.

3. Adobe Lightroom Mobile

  • How to Use:
    • Import your photo into Lightroom.
    • Use the Sharpening tool under Detail.
    • Adjust clarity and contrast to make edges stand out.

Preventing Blurry Photos in the Future


Here are a few tips to take clearer photos from the start:

  • Hold Your iPhone Steady – Use both hands or a tripod.
  • Clean the Camera Lens – Wipe it with a soft cloth.
  • Use Burst Mode for Moving Subjects – This takes multiple shots to catch the clearest one.
  • Tap to Focus – Before taking a picture, tap the screen where you want to focus.

Final Thoughts

Blurry photos can be frustrating, but fixing them is easier than you think! Whether you use the built-in Photos app or a free third-party app, you can sharpen your images in just a few taps. Try these methods and get clear, crisp pictures every time!

Got a favorite photo-fixing app? Share your experience in the comments below!

How to Lock Specific Apps on iPhone Without Third-Party Apps

Keeping certain apps locked on your iPhone can help maintain privacy, especially if you share your device with family or friends. The good news is that you don’t need to install any extra apps—Apple provides built-in tools like Screen Time and Shortcuts to help you lock apps easily.

Follow this step-by-step guide to secure your apps effortlessly.

Table of Contents

Method 1: Using Screen Time to Lock Apps

Screen Time is an iPhone feature that helps you manage app usage, but it can also be used to lock specific apps. Here’s how:

Step 1: Open Screen Time

  1. Open the Settings app on your iPhone.
  2. Scroll down and tap Screen Time.
  3. If you haven’t set it up, tap Turn On Screen Time and follow the prompts.

Step 2: Set a Screen Time Passcode

  1. Tap Use Screen Time Passcode.
  2. Set a four-digit passcode (make sure it’s different from your device unlock code).

Step 3: Lock Specific Apps

  1. Tap App Limits > Add Limit.
  2. Choose a category or tap All Apps & Categories to see all installed apps.
  3. Select the app(s) you want to lock and tap Next.
  4. Set the timer to 1 minute and tap Add.
  5. Once the time is up, the app will be locked. You’ll need to enter the Screen Time passcode to access it.

Method 2: Using Guided Access to Lock Apps Temporarily

Guided Access is useful when you want to restrict access to just one app at a time, preventing anyone from switching apps.

Step 1: Enable Guided Access

  1. Open Settings > Accessibility.
  2. Scroll down and tap Guided Access.
  3. Toggle it On, then tap Passcode Settings to set a passcode.

Step 2: Start Guided Access

  1. Open the app you want to lock.
  2. Triple-press the Side/Home button.
  3. Tap Start to activate Guided Access.
  4. To exit, triple-press the button again, enter your passcode, and tap End.

Method 3: Locking Apps with Shortcuts and Automation

The Shortcuts app lets you create an automation that locks apps when opened.

Step 1: Create an Automation

  1. Open the Shortcuts app.
  2. Tap Automation > Create Personal Automation.
  3. Scroll down and tap App.
  4. Tap Choose, select the app(s) you want to lock, and tap Done.

Step 2: Set Up a Lock Action

  1. Tap Next > Add Action.
  2. Search for Lock Screen and select it.
  3. Tap Next > Done to save the automation.

Now, whenever someone tries to open the selected app, the screen will automatically lock, requiring Face ID, Touch ID, or a passcode to unlock.

Final Thoughts

Locking apps on your iPhone without third-party apps is easy using Apple’s built-in features. Whether you use Screen Time, Guided Access, or Shortcuts, these methods help keep your apps private and secure. Try them out and choose the one that best fits your needs!

How to Recover a Hacked Apple ID & Protect Your iPhone

If you suspect that your Apple ID has been hacked, don’t panic. Follow these steps to regain control and secure your account.

Step 1: Check for Signs of a Hacked Apple ID

Look for these warning signs:

  • You receive an email about changes to your Apple ID that you didn’t make.
  • You can’t sign in to your Apple ID account.
  • You notice unfamiliar purchases or messages sent from your account.
  • Your device is locked or lost unexpectedly through Find My iPhone.

If any of these apply, proceed with recovery steps immediately.

Step 2: Reset Your Apple ID Password

  1. Open a web browser and go to iforgot.apple.com.
  2. Enter your Apple ID (usually your email address).
  3. Follow the on-screen instructions to reset your password.
  4. If prompted, answer your security questions or use another trusted device to verify your identity.
  5. Create a strong new password that you haven’t used before.

Step 3: Sign Out of All Devices

After resetting your password, sign out of all devices to prevent the hacker from accessing your account:

  1. Go to appleid.apple.com and sign in.
  2. Scroll down to the Devices section.
  3. Click on each device and select Remove from account if you don’t recognize it.
  4. Sign back into your trusted devices using your new password.

Step 4: Enable Two-Factor Authentication (2FA)

Two-factor authentication adds an extra layer of security.

  1. Open Settings on your iPhone.
  2. Tap [Your Name] > Password & Security.
  3. Tap Turn On Two-Factor Authentication and follow the prompts.
  4. Enter a trusted phone number where you’ll receive verification codes.
  5. When logging in, always enter the verification code sent to your trusted device.

Step 5: Secure Your Apple ID

  • Update Security Information: Make sure your recovery email and phone number are correct.
  • Avoid Phishing Scams: Never click suspicious links or share your Apple ID login details.
  • Check Account Activity: Regularly review your Apple ID activity at appleid.apple.com.
  • Keep Software Updated: Always update your iPhone and Apple devices to the latest software version.

What to Do If You Still Can’t Access Your Apple ID

If you’re unable to reset your password or regain access, contact Apple Support immediately:

  • Visit support.apple.com and select Apple ID Support.
  • Call Apple Support for assistance.
  • Provide any necessary details to verify your identity and recover your account.

Final Thoughts

Recovering a hacked Apple ID may seem overwhelming, but by following these steps, you can regain control of your account and protect your iPhone from future threats. Stay vigilant, enable security features, and always use a strong password.

How to Change Default Apps on Your iPhone (Browser, Mail, Maps, & More)

default apps

When you open a link, send an email, or get directions on your iPhone, it automatically uses Apple’s built-in apps. But did you know you can change the default apps to ones you prefer? If you like using Chrome instead of Safari, Gmail instead of Mail, or Google Maps instead of Apple Maps, this guide will show you how to set them as your default apps.

Follow these easy steps to customize your iPhone to your liking.

Table of Contents

Changing Your Default Web Browser

Want to use Google Chrome, Firefox, or another browser instead of Safari? Here’s how:

  1. Open the Settings app on your iPhone.
  2. Scroll down and tap on the browser you installed (e.g., Chrome, Firefox).
  3. Tap Default Browser App.
  4. Select your preferred browser from the list.

Now, any links you open will use your new default browser instead of Safari.

Changing Your Default Email App

If you prefer using Gmail, Outlook, or another email app over Apple’s Mail app, follow these steps:

  1. Open the Settings app.
  2. Scroll down and tap on the email app you want to set as default (e.g., Gmail, Outlook).
  3. Tap Default Mail App.
  4. Choose your preferred email app.

All email links will now open in your chosen email app instead of Apple Mail.

Changing Your Default Maps App

By default, Apple Maps is used for directions, but you can switch to Google Maps or Waze:

  1. Unfortunately, Apple does not allow setting a different maps app as the default.
  2. However, you can still use Google Maps or Waze by opening links manually or setting them as the preferred option in apps like Gmail.
  3. If using Siri, say, “Give me directions on Google Maps” to bypass Apple Maps.

Changing Your Default Music App

You can set Spotify or another music app as your preferred choice:

  1. Ask Siri: “Play [song name] on Spotify.”
  2. Siri will ask if you want to set Spotify as your default music app.
  3. Confirm your choice.

Now, when you ask Siri to play music, it will use your selected app instead of Apple Music.

Changing Your Default Messaging App (Limited Options)

Apple does not allow changing the default messaging app for SMS and iMessage. However, you can use apps like WhatsApp or Messenger for non-SMS messaging by manually opening those apps.

Final Tips

  • Ensure your preferred apps are installed before trying to set them as default.
  • If an option is missing, check if your iPhone is updated to the latest iOS version.
  • Some default settings (like Messages and Maps) cannot be changed but have workarounds.

By following these steps, you can make your iPhone

How to Enable Sound Recognition on iPhone for Alerts

Your iPhone can help you stay aware of important sounds around you, like a fire alarm or a baby crying. This feature, called Sound Recognition, listens for specific sounds and sends you an alert when they are detected. It’s a helpful tool if you have hearing difficulties or simply want extra awareness of your environment.

Here’s how to turn on and customize Sound Recognition on your iPhone.

Table of Contents

What Is Sound Recognition?

Sound Recognition is an Accessibility feature that allows your iPhone to listen for and identify specific sounds. When your iPhone detects these sounds, it sends you a notification. You can choose which sounds to track, like:

  • Fire alarms
  • Baby crying
  • Doorbells
  • Water running

This feature works even when your iPhone is on silent mode.

How to Enable Sound Recognition on iPhone

Follow these steps to activate Sound Recognition:

  1. Open the Settings app on your iPhone.
  2. Scroll down and tap Accessibility.
  3. Under “Hearing,” select Sound Recognition.
  4. Toggle the Sound Recognition switch to ON (it turns green).
  5. Tap Sounds to choose which sounds you want your iPhone to detect.

Customizing Sound Recognition Alerts

Once you’ve turned on Sound Recognition, you can select which sounds to track and how you want to receive alerts.

To customize the sounds:

  1. In the Sound Recognition menu, tap Sounds.
  2. Browse the list and select the sounds you want to detect (e.g., “Smoke Alarm” or “Door Knock”).
  3. Ensure the sounds you want to monitor are switched ON.

To customize how alerts appear:

  1. Go back to the Settings app.
  2. Tap Notifications.
  3. Scroll down to Sound Recognition and select it.
  4. Choose how you want to receive alerts (e.g., as a banner on your screen or a persistent alert).

When to Use Sound Recognition

This feature is useful in many situations, including:

  • If you have hearing challenges and want to be aware of important sounds.
  • When you’re wearing headphones or have your iPhone on silent mode.
  • If you want extra peace of mind while caring for a baby or elderly family member.

Things to Keep in Mind

Final Thoughts

Sound Recognition on your iPhone is a powerful tool to keep you aware of important sounds like alarms or a baby crying. With just a few taps, you can enable and customize this feature for extra safety and peace of mind.

By following these steps, you’ll have your iPhone ready to alert you to the sounds that matter most.

How to Download & Use Offline Maps on iPhone for Travel

When you’re traveling or heading to areas with a weak signal, having offline maps on your iPhone can be a lifesaver. With offline maps, you can access directions without using the internet. This guide will show you how to download and use offline maps using both Apple Maps and Google Maps.

Table of Contents

Why Use Offline Maps?

  • No internet needed: Access maps even in areas with poor or no signal.
  • Save data: Avoid using mobile data while navigating.
  • Stay prepared: Always have directions ready during your travels.

How to Download Offline Maps Using Apple Maps

Apple Maps now allows you to download specific areas for offline use. Here’s how to do it:

  1. Open Apple Maps on your iPhone.
  2. Search for a location you want to save (e.g., a city or town).
  3. Tap the Download button if available. If you don’t see it, swipe up on the location card to reveal the option.
  4. Adjust the area you want to save by zooming in or out.
  5. Tap Download to begin saving the map to your iPhone.

To Access Offline Maps in Apple Maps:

  • Open Apple Maps.
  • Tap your Profile Icon (top right).
  • Select Offline Maps to view your saved areas.

Tip: Keep your maps updated by refreshing them when you have an internet connection.

How to Download Offline Maps Using Google Maps

Google Maps also lets you download maps for offline use. Follow these steps:

  1. Open Google Maps on your iPhone.
  2. Search for a location you want to save (e.g., a city or region).
  3. Tap the Menu (three lines or your profile picture in the top-right corner).
  4. Select Offline Maps > Select Your Own Map.
  5. Adjust the map area by moving or zooming.
  6. Tap Download to save the map to your iPhone.

To Access Offline Maps in Google Maps:

  • Open Google Maps.
  • Tap your Profile Icon (top right).
  • Choose Offline Maps to see your saved areas.

Tip: Google Maps offline mode doesn’t show live traffic, but it still provides turn-by-turn directions.

Managing Your Offline Maps

How to Delete Offline Maps:

  • In Apple Maps, go to Offline Maps, swipe left on a map, and tap Delete.
  • In Google Maps, open Offline Maps, select the map, and tap Delete.

Final Tips for Using Offline Maps

  • Download Before You Go: Always save maps while connected to Wi-Fi.
  • Check Storage: Ensure your iPhone has enough space for downloaded maps.
  • Battery Life: Use Low Power Mode to conserve battery during long trips.

By following these steps, you’ll have reliable maps even when you don’t have an internet connection. Happy travels!

Frequently Asked Questions (FAQs)

1. Do offline maps use data? No, offline maps work without using mobile data once downloaded.

2. Can I get directions offline? Yes! Both Apple Maps and Google Maps provide turn-by-turn directions offline.

3. How long do offline maps stay on my phone? Offline maps stay on your phone until you delete them. Google Maps will notify you when updates are needed.

iPhone Emergency SOS

IPhone Emergency SOS

For iPhone 8 and later, to use the Emergency SOS on your iPhone press and hold the side button and one of the two volume buttons until the Emergency SOS appears. You will feel the phone vibrate. Either continue to hold down the buttons and an emergency call will be placed after a countdown and you let go of the buttons or you let go prior to the finish of the countdown and you can choose to make an emergency call.

Table of Contents

Emergency SOS Settings

On your iPhone, go to Settings > Emergency SOS.

iPhone Emergency SOS

You will find instructions on how to activate an emergency call and those are listed here:

Press and hold the side buttons and either volume button to make an emergency call. In certain regions, you may need to specify an emergency service to dial. Auto Call requires a SIM card.

Call with Hold and Release

If enabled and you continuously hold the side button and either volume button, a countdown begins and an alarm sounds. After the countdown, if you release the buttons, iPhone will call emergency services.

Call with 5 Button Presses

If enabled and you rapidly press the side button five times a countdown begins and an alarm sounds. When the countdown ends, iPhone will call emergency services.

Call Quietly

If enabled, warning alarms, flashes, and VoiceOver audio will be silenced when using “Hold and Release” or “5 Button Presses” to place an emergency call.

Emergency Contacts

From here you can add an emergency contact by tapping on Edit Emergency Contacts in Health.

Emergency Contacts

After tapping Edit Emergency Contacts in Health, tap Edit in the upper right corner.

Scroll down to add emergency contact and tap.

Edit emergency contacts

Select the appropriate person. Select the relationship to you.

  • mother
  • father
  • parent
  • brother
  • sister
  • son
  • daughter
  • child
  • friend
  • spouse partner
  • assistant
  • manager
  • other
  • roommate
  • doctor
  • emergency
  • family member
  • teacher
  • caretaker
  • guardian
  • social worker
  • school
  • daycare

Tap Done.

Make An Emergency Call

Make an emergency SOS call by holding the side button down on the right and holding down one of the two buttons on the left.

If you let go of the buttons after the SOS options appear, then you can select the SOS Emergency Call button.

If you continue to hold the buttons after the SOS options appear, then a countdown starts. Once the countdown expires and you let go of the buttons, the iPhone will make a SOS Emergency Call.

iPhone emergency SOS

What if you mistakenly make an SOS call?

Then stay on the line to inform the responder that you don’t need help.

How to Play Podcasts on iPhone Like a Pro

Podcasts are a fantastic way to stay informed, entertained, and inspired. If you’re new to podcasts or want to get the most out of the Apple Podcasts app on your iPhone, this guide will walk you through everything you need to know, from finding shows to managing subscriptions and listening offline

Table of Contents

Getting Started with Apple Podcasts

Apple Podcasts is a free app that comes pre-installed on your iPhone. If you don’t see it on your home screen:

  1. Swipe down from the middle of your screen and type “Podcasts” in the search bar.
  2. If it’s not installed, download it from the App Store by searching “Apple Podcasts.”

How to Find and Subscribe to Podcasts

To discover new podcasts:

  1. Open the Podcasts app.
  2. Tap Browse (bottom right) to explore recommendations.
  3. Use the Search tab (bottom right) to find a specific show.
  4. Once you find a podcast you like, tap on it.
  5. Hit + Follow to subscribe and receive new episodes automatically.

How to Play a Podcast Episode

  1. Go to the Library tab (bottom left).
  2. Select a podcast you’ve followed.
  3. Tap an episode to start listening.
  4. Use the playback controls at the bottom:
    • Play/Pause: Tap the play button to start or pause.
    • Skip Forward/Back: Tap 15s to jump ahead or rewind.
    • Playback Speed: Tap the 1x button to adjust speed (0.5x, 1x, 1.5x, 2x).

How to Download Episodes for Offline Listening

Want to listen without using Wi-Fi or mobile data? Download episodes in advance:

  1. Find the episode you want to save.
  2. Tap the three dots (…) next to the episode title.
  3. Select Download.
  4. Access your downloaded episodes in the Library > Downloaded section.

Managing Your Podcast Subscriptions

To keep your podcast list organized:

  • Unfollow a Podcast:
    1. Go to Library and select the podcast.
    2. Tap the three dots (…).
    3. Choose Unfollow Show.
  • Set Automatic Downloads:
    1. Open Settings > Podcasts.
    2. Tap Download Episodes.
    3. Choose All Unplayed or Only New Episodes.

Tips for a Better Podcast Experience

  • Use Siri: Say, “Hey Siri, play [Podcast Name]” to start listening hands-free.
  • Create Playlists: Tap Library > New Station to organize favorite episodes.
  • Set a Sleep Timer: Tap the moon icon in the player to stop playback after a set time.

Final thoughts

With these tips, you’ll be enjoying podcasts on your iPhone like a pro! Whether you’re catching up on news, learning something new, or just relaxing, Apple Podcasts makes it easy.

How to Use iPhone’s Background Sounds for Focus & Relaxation

Do you need help concentrating or relaxing? Your iPhone has a built-in feature that plays soothing background sounds like white noise, rain, and ocean waves. These sounds can help you stay focused while working, or unwind and fall asleep more easily.

This guide will show you how to enable and customize background sounds on your iPhone in a simple, step-by-step way.

Table of Contents

What Are Background Sounds?

Background Sounds is an iPhone feature designed to minimize distractions and help with focus, relaxation, and sleep. You can choose from different calming sounds and adjust their volume to suit your needs.

How to Enable Background Sounds on iPhone

Follow these simple steps to turn on Background Sounds:

  1. Open Settings on your iPhone.
  2. Scroll down and tap “Accessibility.”
  3. Under the “Hearing” section, tap “Audio/Visual.”
  4. Select “Background Sounds.”
  5. Toggle “Background Sounds” ON.
  6. Tap “Sound” to choose from:
    • Balanced Noise
    • Bright Noise
    • Dark Noise
    • Ocean
    • Rain
    • Stream
  7. Adjust the volume slider to set the loudness.

That’s it! Your chosen sound will now play in the background.

How to Customize Background Sounds

You can personalize your background sound settings for the best experience.

  • Adjust Volume When Media is Playing:
    1. If you listen to music or watch videos, you can control how loud the background sound remains.
    2. Toggle “Use When Media is Playing” ON.
    3. Adjust the “Volume with Media” slider.
  • Turn Off Background Sounds Automatically:
    1. If you only want sounds while using the iPhone, toggle “Stop Sounds When Locked” ON.
    2. This stops background sounds when the screen turns off.
  • Use Background Sounds with Control Center for Quick Access:
    1. Open Settings > Control Center.
    2. Tap the “+” icon next to Hearing.
    3. Now, swipe down from the top-right corner of your screen.
    4. Tap the ear icon, then “Background Sounds” to quickly turn them on or off.

When to Use Background Sounds

Here are a few ways to make the most of this feature:

  • For Focus: Play white noise while working or studying to block distractions.
  • For Relaxation: Listen to ocean waves or rain sounds to unwind.
  • For Better Sleep: Use soothing background sounds to help you fall asleep faster.
  • For Stress Relief: Play calming sounds during meditation or deep breathing exercises.

Final Thoughts

Your iPhone’s Background Sounds feature is a simple but powerful tool to improve focus, relaxation, and sleep. With just a few taps, you can create a peaceful environment anytime, anywhere.

Give it a try and see how it helps you stay focused and relaxed!

How to Create a Custom Ringtone on iPhone (Without Buying One!)

Want to personalize your iPhone with a custom ringtone but don’t want to spend money on one? You’re in luck! In this guide, we’ll show you three free and easy ways to create your own ringtones using GarageBand, iTunes, or third-party apps. No technical expertise required—just follow these simple steps!

Table of Contents

Method 1: Using GarageBand (No Computer Needed)

GarageBand is a free Apple app that allows you to create and set custom ringtones directly on your iPhone.

  1. Download GarageBand from the App Store if you don’t already have it.
  2. Open the app and start a new project by selecting any instrument (e.g., Keyboard).
  3. Tap the Tracks View button (looks like a series of bars) in the top-left corner.
  4. Import your audio file:
    • Tap the Loop icon in the top-right.
    • Go to the Files tab and select your desired song or sound.
    • Drag the file into the timeline.
  5. Trim and adjust the audio to a 30-second section (maximum ringtone length).
  6. Tap the Down Arrow > My Songs to save your project.
  7. Press and hold your saved file, tap Share, then choose Ringtone.
  8. Name your ringtone and tap Export.
  9. Once done, go to Settings > Sounds & Haptics > Ringtone and select your custom ringtone!

Method 2: Using iTunes on a Computer

If you prefer using a computer, iTunes (or Finder on macOS Catalina and later) can help you create and sync custom ringtones.

  1. Open iTunes on your computer and add the song you want to use.
  2. Trim the audio:
    • Right-click the song, select Song Info, then go to the Options tab.
    • Set the Start and Stop time (must be 30 seconds or less).
    • Click OK.
  3. Convert the file:
    • Select the song, go to File > Convert > Create AAC Version.
    • A new shortened file will appear.
  4. Change the file extension:
    • Right-click the new file and choose Show in Finder (Mac) or Show in File Explorer (Windows).
    • Rename the file from .m4a to .m4r.
  5. Sync to iPhone:
    • Connect your iPhone to the computer.
    • Drag and drop the .m4r file into the Tones section in Finder (Mac) or iTunes (Windows).
    • Go to Settings > Sounds & Haptics > Ringtone on your iPhone and select your new ringtone.

Final Thoughts

Creating your own iPhone ringtone doesn’t have to be complicated or costly! Whether you use GarageBand, iTunes, or a third-party app, you can set your favorite song or sound as your ringtone for free. Give it a try and make your iPhone truly yours!